Almost every camera sold nowadays comes with some sort of mode designed to extend, or at least optimise, the dynamic range of the images produced by the sensor. These modes cannot actually alter the performance of the camera’s image sensor, but rather they rely on using software trickery to make the most of the available dynamic range.
Most cameras typically feature one or two modes: one that will create an HDR image; and one that is meant to preserve highlight details in images while boosting shadow detail. Before you begin to use either mode, it is best to know the advantages and disadvantages of each, and understand a little about how they work.
HDR mode
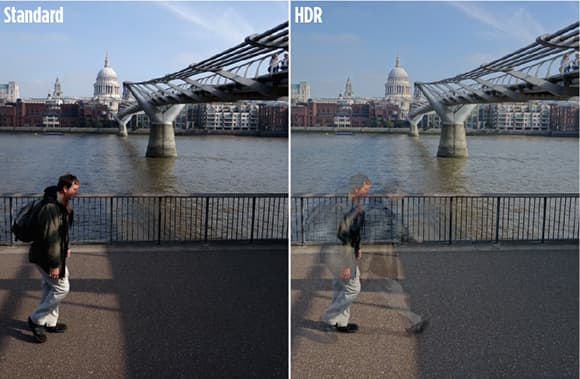
Remember that anything that moves while you are shooting an HDR image in-camera will appear blurred in the final image
With the increase in popularity of HDR imagery, it was inevitable that manufacturers would add such a mode to their cameras. These modes work on the same premise as normal HDR creation, except that all the image processing takes place in-camera.
Just as when creating a manually bracketed HDR image, the camera takes three or more different exposures and blends them together. The first exposure is usually the evaluative-metered exposure the camera would use for the scene. The other two exposures are shot with a darker and lighter exposure to capture more of the highlight and shadow detail.
While the basic principle for creating HDR images is the same from camera to camera, the more advanced capabilities can vary, so it is worth taking the time to find out what options are available to you. The most common customisation is the exposure range of the image, which usually varies between ±0.3-6EV, depending on how strong you want the effect to be. Obviously, the ±0.3-1EV range will produce fairly natural-looking results, while the ±2-3EV range will produce far stronger results.
Sometimes the number of exposures used can also be altered, between three and five shots. However, there is little advantage in using more than three exposures, especially when you are relying on the default camera settings to blend them, rather than using more sophisticated HDR software.
Apart from the control over the exposure of the bracketed HDR images, there is often also the chance to adjust the strength of the HDR effect. A weak setting is usually best for producing a natural-looking image, while a stronger setting will try to reduce most of the image to a range of midtones, but with a very high local contrast. This creates the ‘halo’ effect common in over-the-top HDR images, which most discerning photographers agree should be avoided.
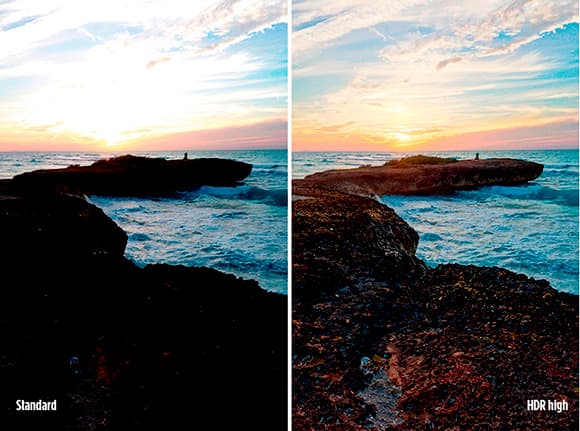
For best results, use an appropriate in-camera HDR setting. There is no point using a strong setting if the scene doesn’t demand it
Dynamic range optimisation modes
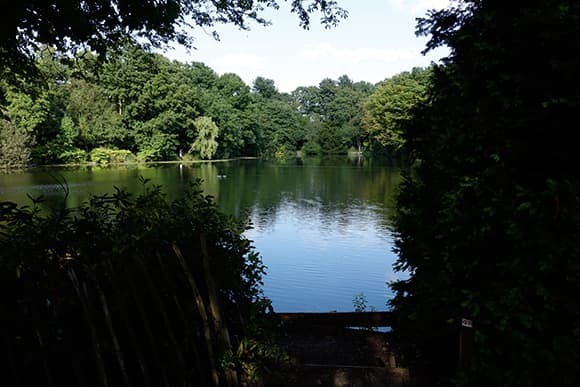
Normal
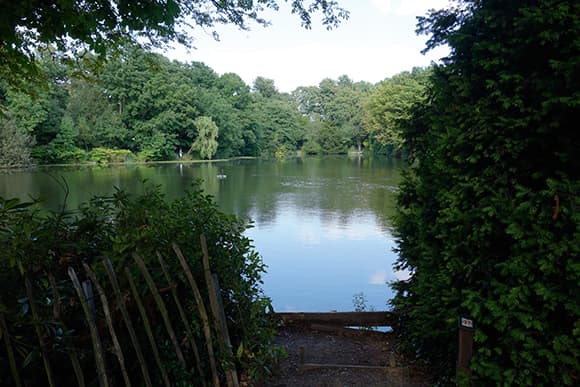
Dynamic range optimiser
HDR
Dynamic range optimiser modes will brighten shadow detail and sometimes reduce highlights, while HDR modes are more extreme, really reducing contrast in the image
As with HDR modes, dynamic range optimisation (DRO) modes are a common feature in digital cameras. As the name suggests, no additional dynamic range is captured in this mode. Instead, it simply optimises the dynamic range available in the raw file and processes it in-camera. Unlike an HDR image, DRO modes only require a single exposure to be taken, with the image then adjusted to retain more highlight detail and boost the brightness of shadow areas.
Manufacturers have different names for their DRO modes. For instance, Sony calls its offering Dynamic Range Optimization or DRO, Nikon’s is Active D-lighting, Canon has Auto Lighting Optimiser, while Fujifilm has christened its version D-Range. Many manufacturers also have highlight and shadow priority modes.

Different cameras have different dynamic range optimisation and HDR modes. Here we see the menu screens from (l-r) Nikon, Sony and Samsung
The way each process works varies between manufacturers, and on the settings used in-camera. In their most basic form, these modes simply adjust the contrast curve of the image so that processed JPEG files have slightly darker highlights or, more commonly, lighter shadow areas. Like HDR modes, the exact strength of the effect can be changed according to preference.
More sophisticated modes will actually alter the exposure of the image. This is usually done by adjusting the sensitivity of the sensor, although most photographers are unaware it has ever taken place.
Often when using these optimisation modes you may notice that you cannot use the camera’s lowest ISO sensitivity. This is because the camera will actually use this setting when taking the image. So, for example, if you have your camera set to ISO 200, the camera will use the exposure settings for ISO 200, but behind the scenes the sensor readout will actually be set as if it were at ISO 100. The result is that the information is then underexposed by 1EV (the difference between the ISO 200 exposure settings and the actual ISO 100 sensitivity used).
This underexposure is used to preserve detail in the highlight areas of the image, but with the result that it also underexposes the shadow areas. To correct this, the shadow areas – basically, anything below a midtone – are lightened when the overall contrast curve is applied. This results in an image with more highlight and shadow detail than a standard ISO 200 image.
Some cameras, such as those in the Fujifilm X series, take this even further by using higher ISO settings. For example, the camera and exposure are set to ISO 400, but the sensor reading is set to ISO 100, resulting in an image that is 2EV underexposed. Again, highlight detail is preserved and the underexposed shadows are brightened to produce a better image.
So all the camera is effectively doing is underexposing, then brightening areas in the JPEG image. The dynamic range of the camera’s sensor isn’t expanded – it is simply making the most of the dynamic range available. You can do this with your own raw images by underexposing the shot and then brightening the shadow areas in raw-conversion software. The result should look almost identical, if not better, as you’ll have more control over the look of the final image.
However, pushing the shadow areas of an image, particularly when they are underexposed, can cause noise to become more visible. This is also an issue when using in-camera dynamic range optimisation modes, although as noise is less of an issue at low ISO sensitivities there is a little more flexibility when it comes to editing the shadow areas. When these modes are pushed to their extremes, however, noise may become more of a concern, depending on the particular properties of your camera’s sensor and how it processes the adjusted images.
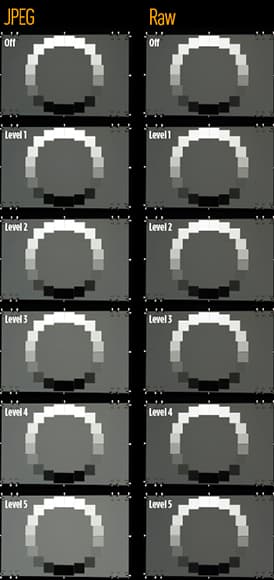
DR OPTIMISER TEST
Our test shows exactly what the dynamic range optimisation settings do. As you can see, as the intensity of the effect increases so does the brightness of the midtones, but the raw images remain completely unaffected
To see exactly what your camera does when in these modes, find a scene with a good range of tones and photograph it with every possible DRO setting. Keep a note of the settings used for each image. By studying each image, you will be able to see exactly where the changes in the image have taken place, and at what point, if any, noise becomes an issue in shadow areas.
One final thing worth noting is that none of the dynamic range optimisation settings is applied to raw images. On some cameras, this means the optimisation modes won’t be available at all if you are shooting raw, while in others they will be if you shoot raw + JPEG. If your particular camera lets you shoot in both modes, it is interesting to see how the settings are applied to the JPEG images, with the unedited raw file available as a reference image. By adjusting the brightness and contrast of the raw image, it is also possible to work out the exact adjustments that have taken place, and then save these settings as presets so you can apply them to any other similar raw images.
Should you use a tripod
When shooting a standard HDR sequence, it is always best to use a tripod. Obviously, all the images you take must be aligned and a tripod is the only precise way to make sure there is no movement between shots, no matter how minimal it may be.
Just as when shooting a manually bracketed sequence to create an HDR image, a tripod should also be used when using a camera’s automatic HDR mode. However, some cameras now feature the ability to automatically align images, even if there is slight movement between exposures. One thing that cannot be aligned is the movement of a subject across the frame – for example, a car driving past, or someone walking through the scene. Moving subjects will cause strange artefacts to appear in the HDR image and they should be avoided. If you do have a scene with a moving subject, use a dynamic range optimisation mode instead.

