Although the default settings that the camera is set to initially are most likely sufficient for general use, if you want to get the very best results from your camera, then adjusting the camera settings can have a range of benefits. These may be in terms of quality or storage space and could even save you time adjusting them later on.
If you’ve never used a SLR before the sheer volume of buttons and settings can be extremely daunting. For those who are struggling, we’ve put together a beginner’s guide to how to set up a DSLR camera.
How to Set Up a DSLR – File Format
Depending on your camera it will usually offer a choice of file format, and this is usually a choice of JPEG or Raw.
The JPEG format is the most common image file on cameras and is the most universally accepted among photo software and image viewers. A JPEG file has already undergone processing within the camera to optimise the image for colour, tone and sharpness, making it possible, in most cases, to print straight from the camera or card if needed. A Raw file, on the other hand, maintains more image information and allows greater flexibility in image adjustment, making it easier to manipulate while maintaining quality.
RAW

This is the highest quality file that your camera is capable of and will therefore allow you to create the best possible image. It is often referred to as a digital negative as the information comes straight from the sensor without any of the camera’s on-board processing, sharpening or compression.
The downside of using Raw files is that they are larger, take up more space on your camera’s memory card, taking longer to write, and then take up more space on your hard drive. As a consequence of being in a non-processed format it also demands more time to be spent in post-processing, therefore increasing the amount of time spent from capture to print.
JPEG

The JPEG format is the most universal picture file and can therefore be opened and viewed by just about any computer or photo viewer. The files are smaller, punchier, less noisy and sharper than the Raw file equivalents, straight from the camera, and can be ready for printing with little or no extra processing.
The captured image from your camera’s sensor is reduced from 12 or 14 bit to an 8-bit file to create a JPEG file. This therefore has a reduced tonal range, and the sharpening and processing can degrade detail in the image. As Raw software has improved, storage capacities expanded, and processors quickened, many of the arguments to stick with JPEG are diminishing.
How to Set Up a DSLR – Image Size/Compression
Within your menu you may also have a choice of image size and image compression. If you have chosen a JPEG format you may be offered a choice of Small, Medium, Large, Normal, Fine, and Superfine; in most cases it is best to choose the largest size and least compression – in this case, Large and Superfine – unless you know for certain that you won’t need the image any larger than for a website or email and you are short on card space. Only a few cameras offer compression and size options for Raw files but here the same rule applies.
How to set up your camera…
Most cameras keep their file format selection within the main menus. To make the process easy for you, we’ve shown how it looks on four popular cameras…
Nikon

The icon-based menu of most Nikon DSLR cameras is easy to navigate. Just look for the camera icon then select Image Quality, and make your choice.
Pentax

Pentax cameras also divide their menus into handy sections. In the file format menu you can choose from JPEG, Raw, and Raw plus JPEG options.
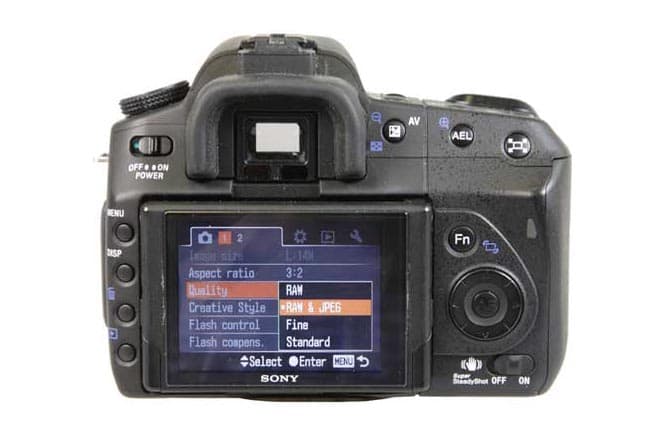
Sony

Sony’s camera menu system is divided into four main icons. The camera icon gives access to a Quality menu, which includes format and compression.
Canon

The slightly more complex arrangement on Canon’s 5D MkII camera gives plenty of options for dual format capture and levels of compression.
How to Set Up a DSLR – Colour Space
Deep in the menus of your DSLR camera , and in some more advanced compact cameras, is an option for your colour space.
The two camera options you will be presented with are Adobe RGB and sRGB, which define how your image’s colour is captured. In basic terms, Adobe RGB offers a wider colour gamut, which means that in some extremes, it is seeing more colours.
The Adobe RGB colour space is designed to cover all of the colours available to your printer, and will therefore offer better reproduction. However, most monitors will not show this full range and sRGB was designed with HP and Microsoft to allow a more accurate representation on screen of the colours. sRGB is also the colour space used for anything web-based.
Also, unless you are using high-end printers, the amount of colours missed by sRGB is unnoticeable and most online labs will actually process in sRGB. In summary, though Adobe RGB is generally deemed superior, sRGB is more user-friendly.

The difference in colour information between the Adobe RGB (in red) and sRGB (in yellow) colour spaces, especially in the blues and greens.
Fact File
Choose from the speed of JPEG shooting or the high quality and flexibility of RAW; alternatively choose a dual format and take the best of both worlds. Colour space can be chosen from the all-encompassing Adobe RGB or the screen-ready sRGB option.


