Technique explained: How to Use Levels Adjustment Layers for Selective Masking
Requirements:
Software: Adobe Photoshop, Photoshop Elements or similar software
System requirements: Windows PC or Mac
Skill required: Medium
Time to complete: 20 minutes

When shooting landscapes, photographers are often faced with a decision: do they expose for the land or the sky? More often than not I choose to expose for the sky, even though this means the land will be slightly underexposed. This is because it is easier to recover detail from a slightly underexposed foreground than it is from an overexposed sky. If the highlights are completely blown out, all detail is lost.
I did this for the above image, and it left the straw bale and field looking dull and lifeless. A number of methods exist for making a selection or mask to help lighten the foreground, but as the straw bale and hills make for an uneven shape, I instead devised a very quick way of masking the sky. I did this using a Levels adjustment layer to make the foreground completely black, then used the Magic Wand tool to quickly and easily select the entire area. The same technique can also be used inversely, to lighten a sky until it is completely white, and then selecting it using the Magic Wand tool.
It is not only landscapes that can benefit from this technique. If you have a picture of a subject against a light background, a Levels adjustment layer can be used to make the background completely white or the subject completely black. Again, the Magic Wand tool can be used to quickly select the subject for adjustment, or for cutting out and placing on another background. I will explain how to do this next time.
Using adjustment layers to create a mask
How to use Layers to lighten specific areas of an image
Step 1.

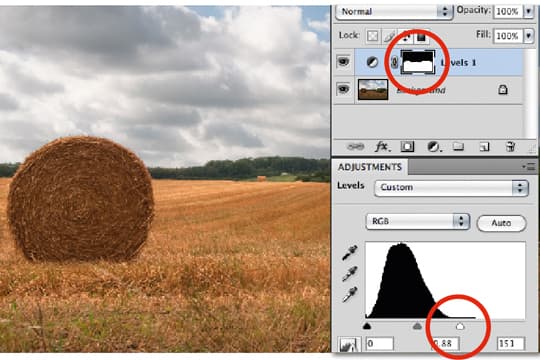
While I am happy with the sky in the original image, the foreground is too dark and dull. The first stage in brightening it is to create a new Levels adjustment layer by selecting Layer>New Adjustment Layer>Levels.
Step 2.

The aim is to separate the land from the sky by using the Levels layer to turn it completely black. In the Levels adjustment layer palette, move the shadows adjustment slider to the right-hand side so that as much of the foreground as possible turns black. For best results you may also need to lighten the sky slightly to create a good separation.
Step 3.

With the land now almost completely black, use the Magic Wand tool and click anywhere in the black area. This should select the entire area. Once the area is selected, delete the adjustment layer.
Step 4.

With the selection still in place, use the Magic Wand tool and go to Select>Refine Edge. This opens a new dialogue, which allows you to refine the edge of the selection. Use the different sliders to make sure that the selection follows the line where the foreground meets the sky. The most useful slider when doing this is the contract/expand selection, which makes the selection larger or smaller. It is important that there isn’t an extremely hard edge to the selection, so you will also want to slightly feather its edge.
Step 5.

Now create a new Levels adjustment layer, as in step 1. You will find that a layer mask is automatically created for this layer, which is the same shape as the selection you have created. To lighten the foreground, it is simply a case of adjusting the Levels slider to brighten the shadows and midtones.
Step 6.

This should lighten the foreground, leaving the sky untouched. However, when viewing the image at 100% you may notice that there is a slight halo effect in some areas where the land meets the sky. This is due to the masked area of the sky not quite reaching the line at the top of the trees. This causes a small area of the sky to lighten with the foreground.
To get rid of any halo areas, select a small black brush with an opacity of around 80%. With the layer mask selected, paint over the light areas with the black brush.


