Portraiture
AP photographer Andrew Sydenham demonstrates to three readers how a simple arrangement of lights can produce effective portrait photography. Oliver Atwell joins them
Many photographers begin their love of photography by taking pictures of their friends and family. Be it holiday snaps or makeshift portraiture set-ups, shooting people we’re comfortable with is an easy way to start understanding the ins and outs of our cameras and how light interacts with the subject being photographed. That’s why in this Masterclass, AP’s resident photographer Andrew Sydenham will be exploring the basics of portraiture and how a simple set-up in the home can produce effective results.
‘In this Masterclass we’ll be looking at some very basic lighting,’ says Andrew. ‘We’ll look at how we can use light to shape and soften our subject, as well as shadow reduction on the subject and the background. We’ll start by looking at high-key lighting and how we can photograph our subjects against a pure-white background.’
Andrew says that different lighting set-ups can create various degrees of mood within an image. ‘After the more commercial-looking portraits produced with high-key lighting, we’ll take look at low-key lighting,’ says Andrew. ‘Low-key is a lot more atmospheric and expressive, so we can have plenty of fun exploring that. It’s a firm favourite with a lot of people who work in portraiture and the results that you can achieve are very expressive.’
Rather than using models, our readers will be photographing each other, meaning that they can feel comfortable moving at their own pace. The day will also find our readers working with two small sets.
‘The sets we’ll be working with today are being kept to an absolute minimum,’ says Andrew. ‘The idea is to work in an area that can easily be replicated in the home. The key thing to remember throughout this whole day is how these techniques and ideas can be applied to objects and lighting found around the average home.’
Andrew will also show the readers some helpful accessories, such as snoots and softboxes, that can either be built from scratch at home or bought cheaply online.
‘When you realise how easily these objects can be made at home, you’ll begin to see that producing your own basic portraiture images need not be a matter of renting out a studio,’ says Andrew. ‘Portraiture is one of the most fun things you can do. There’s nothing more satisfying than manipulating the light to bring the best out of your subject.’
Your AP Master…
 Andrew Sydenham
Andrew has been a London-based studio photographer for more than 20 years, working for a wide variety of editorial and advertising clients. Specialising in food and still life, he has contributed to more than 100 books and magazines. He provides product photography for Amateur Photographer and What Digital Camera, and is passionate about lighting techniques and equipment. Andrew also teaches on Foundation in Photography and Foundation in Digital Photography SPI courses.
The AP readers…
 Maria Mil
Maria has a passion for portrait photography and is hoping one day to make it a full-time profession. She uses a Canon EOS 60D. ‘It’s been a really nice day,’ she says. ‘No matter how much you think you know, there’s always some other little tip that can change the way you approach your subjects.’
 Chris Randle
Chris enjoys shooting various subjects, but is particularly keen on portraiture. He uses a Canon EOS 5D Mark II. ‘It was a brilliant day,’ he says. ‘Getting a successful portrait image isn’t always the easiest thing to pull off, but this day helped no end.’’
Colin Roberts
Colin describes himself as a keen amateur who started taking portrait images around two years ago. He uses a Canon EOS 400D. ‘Today has been a great opportunity,’ he says. ‘Having had a bit of a break from photography, this was a great way to get back to doing what I love.’
Would you like to take part?

Every month we invite three to five AP readers to join one of our four experts on a free assignment over the course of a day, with food and refreshments provided. The experts are Tom Mackie (landscapes), Cathal McNaughton (documentary and photo essays), Annabel Williams (location portraiture) and Andy Rouse (wildlife).
If you would like to take part, visit transport.kelsey.host/amateurphotographer/masterclass for details of how to apply. Please remember to state which Masterclass you would like to attend and make sure you include your name, address, email address, daytime telephone number and two or three examples of your work (preferably in your application). Each participant will be able to use his or her own camera, lenses and other equipment.
Breaking it down
 Photo by Andrew Sydenham
The first thing that Andrew is keen to discuss is the type of equipment the readers will be using.
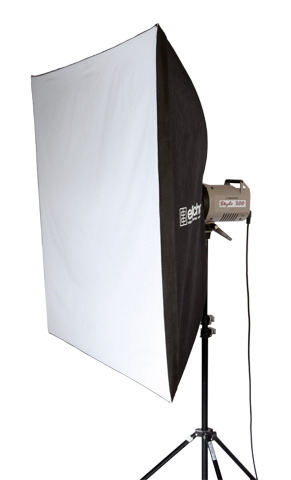
‘Today we’re in a studio environment, so we’ll be using the continuous lighting emitted from our monolights,’ says Andrew. ‘We’ll also be using a series of accessories that we can attach to our lights to shape and mould the subject. However, I don’t want us to look at these lights and accessories as studio equipment. A lot of people can become a little overwhelmed by the numerous buttons and switches on this type of equipment. We just want to use these lights at the most basic level. At the end of the day the lights are just bulbs that can be switched on and off, just like a desk lamp or overhead light. A simple device like a directional lamp can produce some fantastic results when applied correctly. Everyone has desk lamps lying around and these little lights can produce some serious lighting. If you can control that light by using things like makeshift snoots and softboxes, then you’re halfway to producing successful portraits at home.’
Andrew is also keen to point out that the accessories the readers will be working with today can be put together using everyday objects.
‘A softbox is just a box,’ says Andrew. ‘The only difference is that it has a sheet of translucent material over the opening to diffuse the light. That isn’t difficult to do yourself using a cardboard box and some tracing paper or kitchen roll. If you want to diffuse the light even more, you just double up on tracing paper. A snoot can be made from a piece of thick black card rolled into a cone shape and placed over your light source. The point is that anything we do here today can be replicated in the home. Everyone has white sheets or card that can be used as a reflector. That’s one of the most exciting things about this – the DIY trial-and-error nature of trying to replicate these effects in your living room.’
Lenses and Depth of Field

As with any genre of photography, your choice of lens should be a primary consideration.
‘The two lenses that are, in my opinion, ideal for portrait photography are a 85-100mm and a 70-200mm,’ says Andrew. ‘Both of these should provide a comfortable amount of distance between you and your subject, while using a zoom lens gives you a bit of free range to move in closer or a little further away from your subject without having to move your position.’
A common problem that photographers new to portrait photography can encounter is trying to make sure that every part of the subject’s face is in focus. Anyone who has experience in portrait or even wildlife photography will know the horror of opening an image on-screen only to find that while the subject’s nose is in focus, their eyes lack the necessary sharpness.
‘Take your time and think about what you are doing,’ says Andrew. ‘There can be a tendency when working with live subjects to feel under pressure and rush things. I would suggest using autofocus to lock onto your subject and then switch to manual to tweak the focus and ensure the eyes are pin sharp. What you are looking to get in focus is everything from the tip of the nose to the ears. The thing to know is that there is a delicate balance between your light source, ISO, shutter speed and aperture. The important thing, as I’m sure everyone understands, is to get the eyes in focus, but you should really strive to get the whole head pin sharp.’
There are ways to ensure that you get your subject completely in focus, says Andrew. ‘The most obvious thing to do is to close down your aperture,’ he adds. ‘If you’re working with f/5.6, try closing it down to f/8 or f/11. However, that means you’re going to have to compensate for the reduced amount of light that is reaching your sensor. You could perhaps try using flash or introducing a second light source (including window light). If that isn’t an option, you will either have to increase your ISO (although this could result in noise) or you could decrease your shutter speed. These may sound like obvious things to say, but you’ll be surprised how many people neglect these basic technical principles.
High-key lighting
A single light source is the most obvious starting point when shooting portrait photography, although Andrew says it can sometimes result in some unsatisfactory images.
‘It’s worth setting up a single light with no softbox or reflector and using it as a reference point that you can build from,’ says Andrew. ‘You’ll see that the light is throwing a rather harsh shadow onto our background. It could be that this is the effect you’re looking for, but at the same time it can also be an incredibly distracting element. It’s a common error in images by people still trying work out the principles of portrait imagery, but we’ll look at a way to fix that later.’

Andrew says that a single light source is perhaps not the most flattering of set-ups, as the light can emphasise wrinkles and hair. ‘Using a single light produces the kind of contrast-heavy light you’ll use when you want to really explore the nooks and crannies of someone’s appearance,’ says Andrew. ‘It’s definitely not the kind of light you’ll want to use if you’re looking to flatter someone. However, as we’ll see, it can be used brilliantly in low-key moody portraits when working with a dark background.’

If you’re looking to create a flattering portrait, then the use of a softbox will give you the desired results. ‘The softbox will diffuse the light and spread it out more evenly across your model,’ says Andrew. ‘Placing a reflector on the opposite side of the subject will then disperse the harsh shadows that we just discussed, yet still retain enough depth in your subject so it isn’t completely flat.’
Rather than using a softbox, readers may want to consider using an umbrella. ‘A parabolic umbrella is a way of aiming light away from your subject and into a reflective umbrella that bounces the light back onto the subject,’ says Andrew. ‘As the light is reflected, it spreads over the subject and invariably softens the light. The key thing is that, because of the shape of the umbrella, it actually wraps the light around the subject.
Reflectors

Andrew explains how to use reflectors to the best effect. ‘The best way to establish a more balanced distribution of light is to use a reflector,’ says Andrew. ‘A white reflector will bounce light back into a subject, which will help to soften areas that would otherwise be quite dark, and act as a general fill light. Silver reflectors reflect more light back into your shot and are a lot cooler with regards to colour temperature,’ adds Andrew. ‘The effect will be a little more dramatic and give you stronger contrasts. Alternatively, a gold reflector will project warmth onto your subject.
Three-Point Lighting

Andrew suggests that if anyone is looking to create a classic high-key shot they will need to introduce another light source. The method that Andrew is referring to is called three-point lighting, where three lamps (or in this case two lamps and a reflector) are employed to illuminate the subject.

‘You’ll have three sources of light,’ says Andrew, ‘comprising a key light, a fill light and a back light (otherwise known as a rim light). The key light is the principal source of illumination and will shine directly on your subject. The fill light (our reflector) will balance the key light and fill in the darker parts of the subject. The back light will then shine on the subject from behind, helping to separate your model from the background and provide some definition. It’s a classic set-up and one you’ll no doubt use again if you decide to pursue portrait photography seriously. It’s a very commercial way of working, but it’s a simple method that can help you understand lighting.’
Snoots

On a final high-key note, Andrew gives a quick introduction to a handy little item called a snoot. ‘A snoot is an attachment that can work in either high- or low-key images,’ says Andrew.

‘It’s a conical-shaped object that attaches to the front of your light and narrows down the beam so that it lands on a concentrated area. Look at the image of the flowers and see how the light falls on the subject. If you want to illuminate just one area, such as the face, it’s a great tool. It’s also easy to make out of thick black card.’
Low-key Lighting

Chiaroscuro lighting is a term that is more commonly applied to Renaissance and Baroque paintings. The style was used to introduce a sense of realism into paintings, by using the contrasts between light and dark tones to create a sense of depth. More recently, it is a technique that has found its way into the world of photography. Readers may be more familiar with the method under its less intimidating name of low-key lighting, a set-up generally shot against a black background.
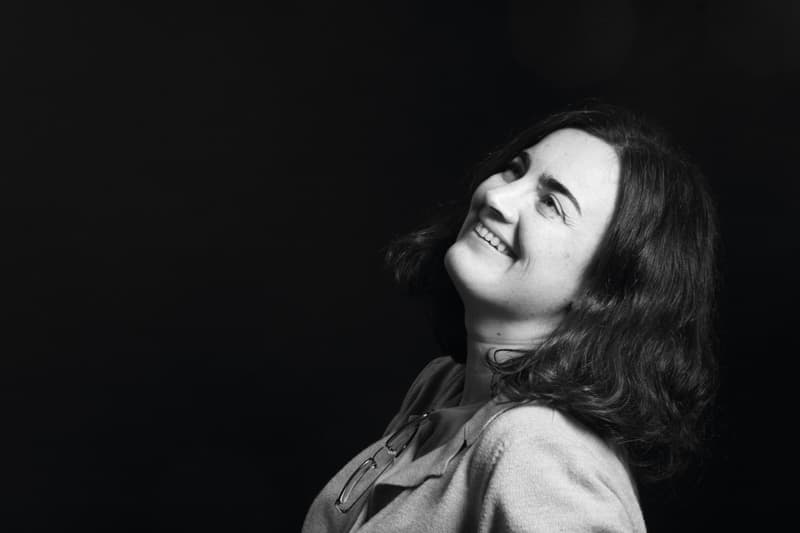
‘Low-key lighting deals with the contrasts between light and dark areas,’ says Andrew. ‘It’s an expressive way of lighting your subject and is enormous fun to play around with. It’s a look that we’re used to seeing in classic film noir gangster movies, and is therefore seen as very cinematic.
‘You’re essentially using the same simple set-up that you did when you were working with the white background – namely, a single light source and a reflector,’ continues Andrew. ‘It’s an excellent set-up to use when you’re stuck with just one light source. The simplest way to achieve this look is to place your light directly to one side (around 2-3ft or 60-90cm away) and position your reflector on the opposite side. However, it may be that you want one side of the face to be completely enshrouded in shadow. If you do, remove the reflector and work with the single key light.’

Low-key lighting is a method that demonstrates the idea of ‘sculpting with light’ perfectly. ‘When you work with low-key lighting, you really begin to appreciate how you can use light to emphasise the depth of a subject,’ says Andrew. ‘A photograph is a two-dimensional medium, but using light can help us create the illusion of three dimensions. Taking the idea of sculpting somewhat literally, we can employ barn doors. Barn doors are used to control exactly where the light falls. You either open or close the doors to prevent the light falling onto any areas that you want to keep black. This can be easily replicated at home using some thick black card and taping it to the side of your light source.

‘Low-key lighting is a look that naturally lends itself to monochrome,’ says Andrew. ‘It adds real atmosphere and mystery. When you take a low-key image it’s worth seeing what it looks like in black & white. The high contrasts that you’ll get from using a single light source are incredibly dramatic. When you import your file into Photoshop, go to Image>Adjustments>Channel Mixer and click the Monochrome box. You can then adjust the Levels accordingly.’
Working at home can carry the risk of ambient light coming in through a window, ruining an otherwise good low-key shot. But Andrew has a valuable tip. ‘When you’re working in a place surrounded by ambient light, it can be tricky getting the blacks completely black,’ he says. ‘The thing to remember is that you want to keep your ISO as low as possible as digital grain will really show up on a dark image.
Before switching on your light source, set your camera to manual exposure mode and your f-stop to the widest aperture possible. You should then close the aperture down further and further (manual mode will ensure that you maintain the shutter speed that you intend to use for the shot) until any ambient light has disappeared, You’ll be able to see if you have any light from the back of your preview screen (the screen will be black). Check your histogram – the graph of the histogram should be towards the left-hand side of the chart.


