
With such a huge array of screens and tools, Adobe Lightroom can, at first glance, seem pretty daunting. However, initial impressions can be deceptive, because with a basic understanding of what the software can do and how it works, you’ll find Lightroom is extremely user friendly. In later articles, we’ll look at the various elements of the software, but first it’s important to cover some of the basics. If you aren’t familiar with Lightroom this should prove useful, and even if you’ve been using Lightroom for a while it won’t do any harm to have a refresher course.
What is Lightroom?
Image management
At its core, Adobe Lightroom has three main functions. First, it’s an image library tool, a place where you can go to manage all your photographs. Second, it’s a place to edit those images. Third, it’s a place to export those edited images so they can be seen elsewhere. Lightroom works by creating a catalogue of images. As you take images, you save them to your hard disk drive, as usual, but then import them to the Lightroom Catalog. The Catalog is just that – a catalogue. It isn’t a folder with all your images, but merely a list and preview of them, along with all the shooting information saved to one big database file – an ‘.lrcat’ (Lightroom Catalog) file to be precise.
Every time Lightroom loads, it loads your Catalog file so you can see all your images in one place and begin working on them. Obviously, it can be a lot of work if you have tens, if not hundreds of thousands of images to work with, so Lightroom will let you organise the images in a number of ways.
Images can be keyworded, making it easy to search for photographs based on a certain subject or theme. They can also be rated out of five, making it quick to find all your best shots, and they can even be tagged with a colour – for instance, any image that you have edited and are happy with can be tagged green. Shooting information metadata contained within an image file can also be searched for.
And of course, you can combine all these different types of search parameters. So, for example, if I wanted to find all my best-edited images of sunsets, I could do a keyword search for sunset, with the five-star rating and green colour activated. Only the best sunset images will then show, rather than having to scroll through many hundreds of others. Once I have these images selected, I can even save them as a Collection called ‘Best Sunsets’. This doesn’t create a new folder on my computer called ‘Best Sunsets’. It just means that if I click on the collection in Lightroom, it will gather a preview of all these images in one place for me. This makes it easy to work on image projects without having to move original copies of your digital image files around your hard disk. This is a basic example, and is barely touching the surface of what Lightroom is capable of, but it gives you an idea of how, with a properly managed library, powerful Lightroom can be.
What is key to understanding this software, and what can be difficult at first to grasp, is that Lightroom never edits or moves any original images on your hard disk (unless you specifically tell it to, and even then it gives you a warning). All it does is record the location of your images on your computer and links to them, which allows you to work with them.
Non-destructive editing
Once again, it’s worth emphasising that Lightroom doesn’t edit your image files. As a general rule, changes are saved within the Lightroom Catalog, which is why it is such an important file. If the Catalog file is deleted or becomes corrupted you will lose a lot of your work in Lightroom, which is why it regularly asks if you wish to create a back-up of the file.
But even if the file is deleted, all your original images will still be on your hard disk drive in the same location they have always been. This is because Lightroom is what is known as a non-destructive editor. Rather than amending an image file, it saves your edits as a list of changes in the main Catalog file.
Editing raw files
Lightroom is primarily designed to work with raw files, although it can also be used with JPEG, TIFF and Photoshop – in fact, most image files. Regardless of which file type you work with, remember that you are working non-destructively.
The easiest way to think of working non-destructively is to imagine the raw file as a digital negative. When you begin editing and working on a photograph in a darkroom you are making adjustments to how that negative is going to be printed. The exposure, colour and contrast are all adjusted to your taste and then a print is created from that negative. With the final print made you still have the original negative, and your list of exposure, colour and contrast settings, so at any point you can go back and make another copy, or continue to refine the image.
The darkroom is a good analogy of how Lightroom operates. You open your original raw file – your digital negative – make a series of adjustments, then when you are happy, you can export (save) the image to another file, which is in effect like making your darkroom print. At any time you can go back to Lightroom and open that image and the Lightroom Catalog will automatically have the list of exposure, colour and contrast adjustments made to the original file.
You can then tweak these adjustments further or, if you wish, revert to the original file, which is still sitting – exactly as it always has been – on your hard drive.
Obviously, Lightroom enables you to alter a lot more than just exposure, colour and contrast. In effect, it is exactly the same as editing a raw file in Adobe Camera Raw, since virtually all the basic image-editing controls are the same.
However, Lightroom is much more sophisticated than Camera Raw, thanks to the easy-to-use import and export options on offer.
Exporting images
Once your image is looking just as you want, it’s time to export it. As you aren’t ever editing the original file you cannot simply hit ‘Save’. Saving may seem more convenient, but remember the point of Lightroom is to leave these original files untouched – you cannot simply write over them. Instead, you export the image to a different file. Again, there are a number of file types you can save your image to when exporting. In addition, you can even constrain the size if you need to create smaller versions for internet use.
We’ll talk about exporting later in this supplement, but basically the edited image is saved as a new file, in the location of your choice on your computer.
Modules
While the management and editing of images is the primary function of Lightroom, its capabilities don’t stop there. The latest version of the software is split in to seven modules, each representing part of a workflow. The Library Module is where you organise your images, while the Develop module is where the image editing takes place. There is also a Map module, which lets you see exactly where your GPS-tagged images have been taken or you can assign a location to a shot. The Book module lets you design books of your images, and even upload your book designs to Blurb for printing into an awesome photo book.
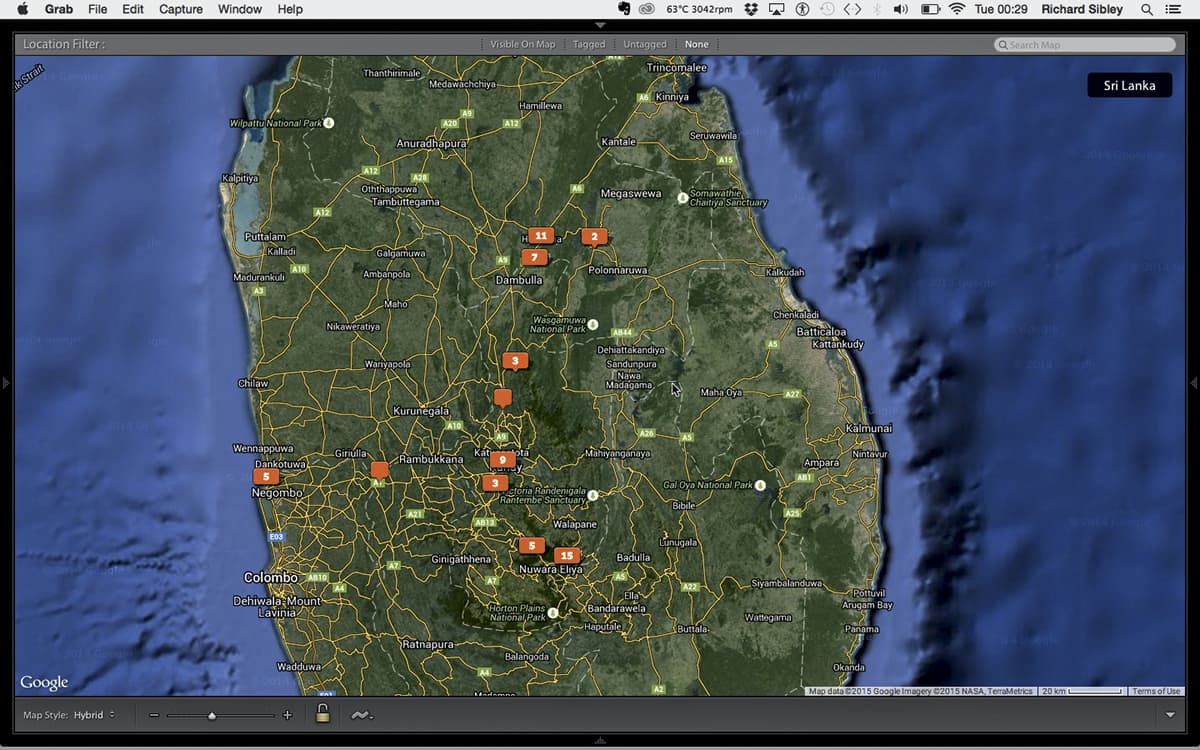
Images with GPS information can be seen on the Map Module screen
Alternatively, books can be saved as PDF files for you to take to an independent printer. The Slideshow module lets you create slideshows of your images, including selecting music, while the Print module allows your images to be printed. Again, there are various layouts for prints, including the creation of contact sheets. Finally, the Web module allows basic web galleries to be created, with the files available for you to upload to your own web space.
Even within these modules there are many more features, such as the option to export your images to Facebook, Flickr, Alamy and many other services, or to export images with a watermark embedded. And there is now the option to have Lightroom on your mobile, which allows you to carry around selected Collections of your work in your pocket, and to save the images taken with your smartphone directly to the Lightroom Catalog on your computer.
As you work through our more advanced articles on Lightroom, we’ll look at more of the key features in each of the different modules, and Martin Evening will offer some handy tips for making the most of this excellent software.
Create folders so you can find and import your photos easily
When you’re dealing with vast numbers of images, it’s important to have them properly organised. Lightroom can help with this, but the best starting point is to make sure you have a good folder structure on your computer. This will make it easier to import images to Lightroom, and more importantly, make it easier for you to manage a vast number of images.
There are many ways to organise your files and folders on a computer, but here is our preferred method, which assumes that you are saving all your images onto a separate drive. Start with parent folders, which are sub-divided by year, and then into subjects. For example, Hard disk>Places>2015> Malta. This system also makes it easier to back up images to another hard disk, as you can simply copy a whole folder to the back-up drive.
Within each final folder – Malta, for example, in the diagram (below) – would be sub-folders for finished files and files saved for web use. So, for example, Hard disk>Places>2015>Malta>Finished>Web.
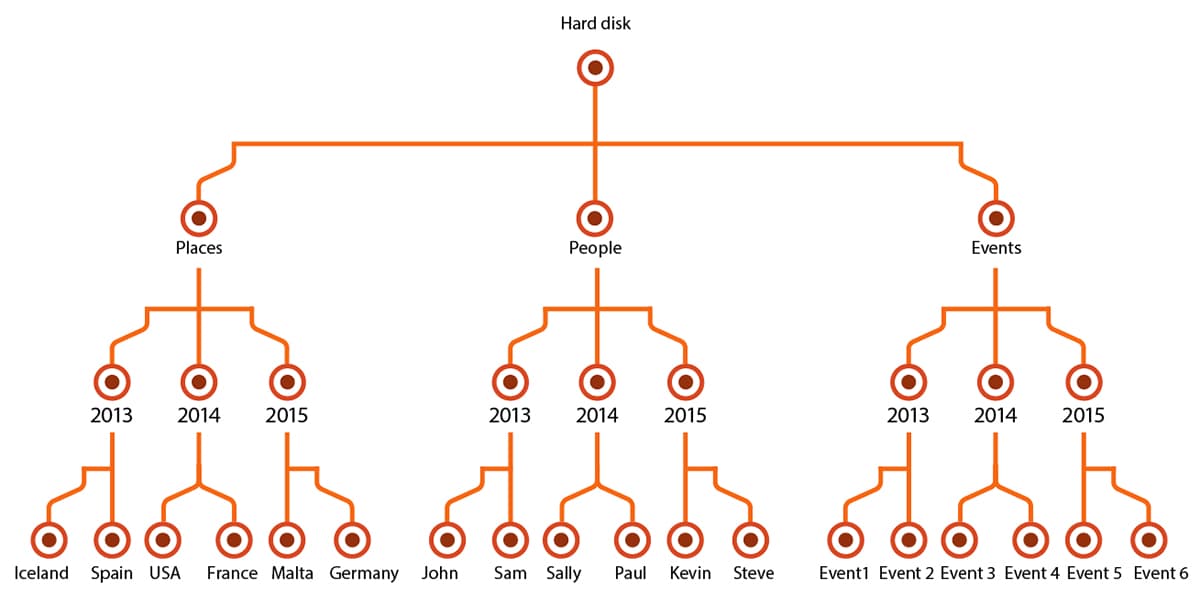
It’s important to have a good folder structure rather than simply having all your images spread over various hard disks and folders. Keep the folders well structured, as shown in this diagram, and it will be much easier to find and edit your images.


