

Judging from the direction of the light in this image by Felix Tholen, it looks like it was taken either early morning or late evening, which is why it seemed appropriate to treat this image with a warm tone.
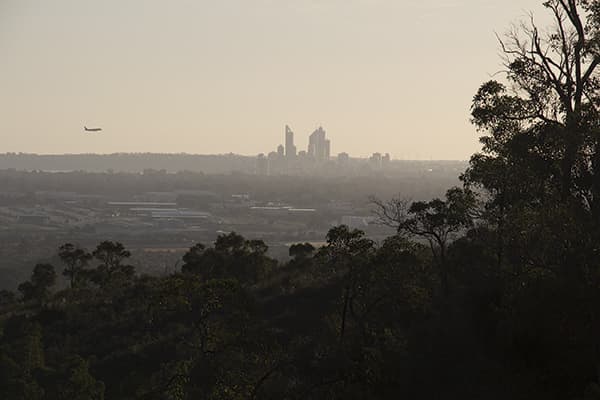
When capturing a high-contrast scene such as this as a raw image, the colour in the sky may become lost, so it was necessary to restore this in the post-processing. What helps make this image visually more interesting is the plane flying in from the left.
However, this photograph does suffer from rather bad chromatic aberration, which is visible as coloured fringing towards the corners of the frame. This is probably because a super-zoom lens was used. Even the more expensive zooms, as well as some prime lenses, may exhibit a certain amount of detectable colour fringing, but here it is particularly noticeable around the tree branches. However, it is an easy enough problem to fix using Camera Raw or Lightroom.

1. Tint adjustment
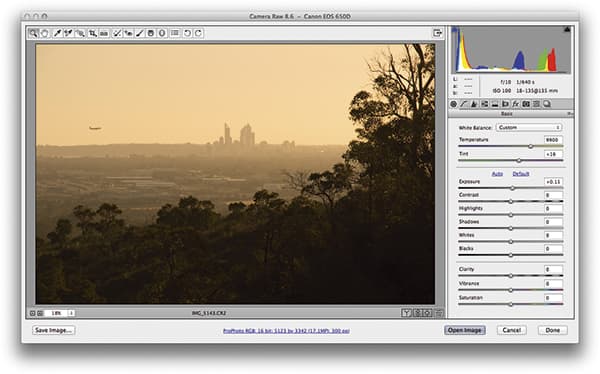 There was a slight tilt to the photograph, so to begin with I used the Straighten tool in Camera Raw to drag across the horizon. I followed this by applying a Tint adjustment that warmed the image up, emphasising the sunset lighting. I combined this with a positive Exposure adjustment to lighten the image slightly.
2. Boost Vibrance and Clarity
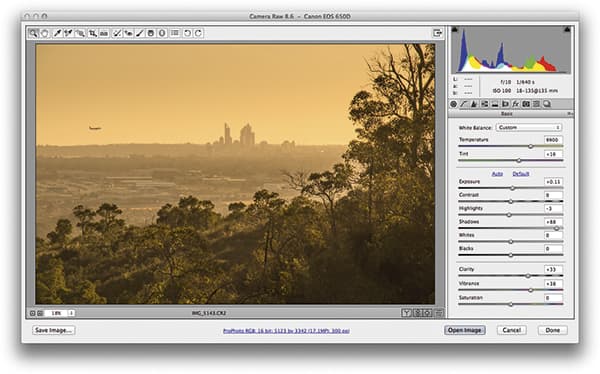 Next, I adjusted the Shadows slider to bring out more detail in the trees in the foreground. At the same time, I chose to boost the Vibrance to produce richer-looking colours. I also applied a large Clarity boost, which helped emphasise the contrast in the tree branch detail.
3. Remove fringing
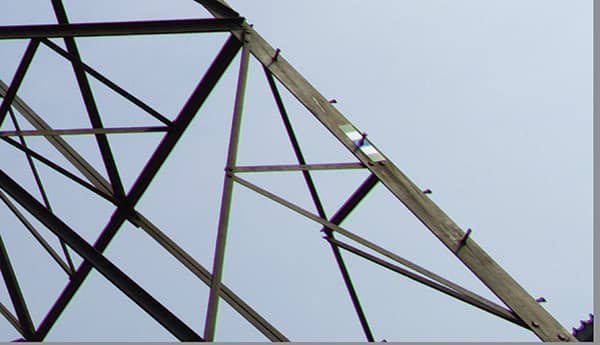
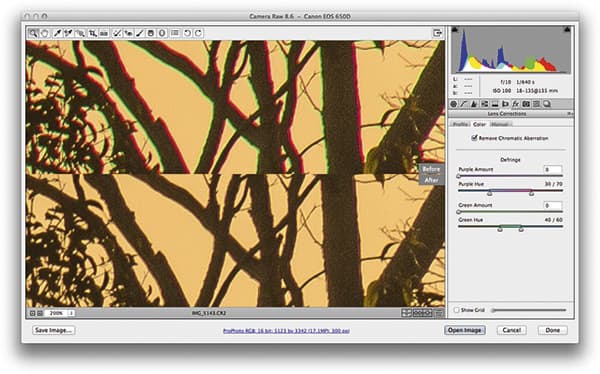 I noticed that there was significant lateral chromatic aberration towards the corners of the frame. In this close-up screenshot you can see signs of green/purple fringing around the edges of the tree branches. To correct for this, I ticked the Remove Chromatic Aberration box in the Lens Corrections panel.
Chromatic lens aberrations
Lateral chromatic aberrations can commonly be seen towards the edges of photographs and are caused when the lens optics fail to correctly focus the red, green and blue portions of the colour spectrum evenly. It is more noticeable with digital images because of the way the sensors record these three colours as separate colour channels, whereas colour film emulsions record more or less a smooth spectrum. The lens aberrations are still there, but they just aren’t as noticeable.
One way to avoid this with digital cameras is to use good-quality optics. Or, failing that, you can use the Remove Chromatic Aberration box in the Lens Corrections panel to remove this automatically at the raw-editing stage. This method can work with JPEG captures, but you’ll get better results when processing raw files.


