
Richard Sibley explains how to use the digital darkroom to rescue a flat portrait and transform it into a high-key black and white portrait
Technique explained: High-key black & white portrait effect
Requirements:
Software: Adobe Photoshop, Photoshop Elements or similar software
System requirements: Windows PC or Mac
Skills required: Low
Time to complete: 15 minutes

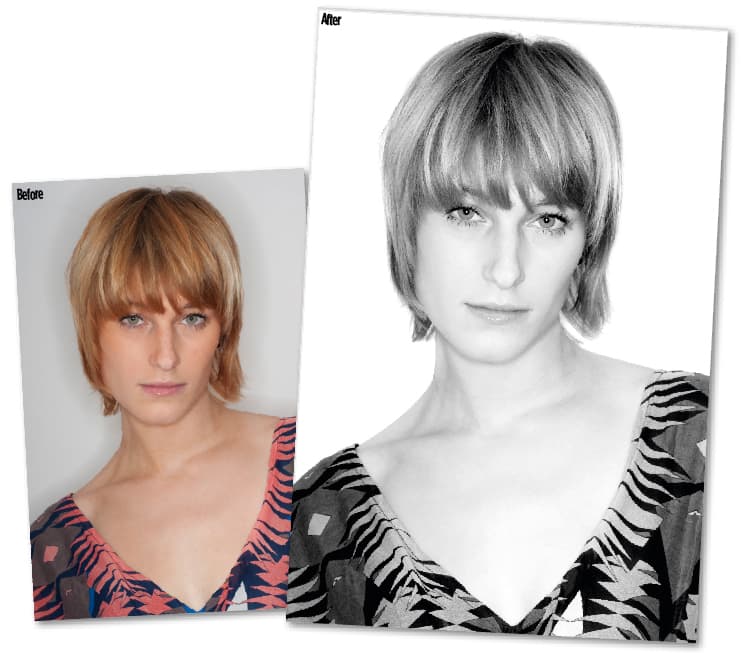
It can be difficult to get a completely white background in a small home studio. Often there is not enough room to position two lights on either side of a background, or the small space means that the light bounces around and ends up looking flat. This was the case with a portrait I shot recently.
With a low ceiling and no room to place a light behind the subject, the light from a ringflash produced flat lighting and a grey background. However, this produced a suitable image from which to create a high-key portrait image.
Traditionally, high-key portraits have few completely black areas, and much of the image is very light. A good rule of thumb is to make sure that the subject’s pupil and eyelashes are black, and that the lightest part of the skin is as light as it can be before it goes completely white (a tonal value of 255).
Using a few of Adobe Photoshop’s basic tools, I was able to achieve this effect and turn the background completely white. I converted the image to black & white with an orange filter effect created using the Channel Mixer, with the red and blue channels set to 50%. Using the blue and green channels too much makes the skin and hair look darker, while the red channel can make the skin look washed out. I find the orange filter effect to be a good compromise.
Once converted, it is a case of using the Levels and Curves controls to create the high-key effect.
High-key conversion
Using Levels and Curves to create a high-key portrait
Step 1. The original colour image is quite flat and evenly lit, making it a good candidate to transform into a high-key image.

Step 2. First, convert the image to black & white by selecting Image>Adjustments>Channel Mixer and ticking the Monochrome box at the bottom of the panel. The Orange Filter Preset produces the best results, as it lightens hair and skin tones without making them as bright as the Red Filter option.

Step 3. Use the Levels tool (Image>Adjustments>Levels) to ensure there are blacks in the image. Select the shadow marker and hold down the Alt key while dragging it to the right. As you do this the areas that become black will be shown. Move the marker until the subject’s pupils are black.

Step 4. To create the high-key effect, the highlights and midtones need to be lifted. To do this, select the Curves tools (Image>Adjustments>Curves) and lift the line to create a steep curve. Be careful not to create patches of white on the subject’s skin.

Step 5. Now go back to the Levels tool and this time select the highlight marker. Hold down the Alt key and drag the slider to the left until as much of the image has turned white as is possible without losing any tones in the subject’s skin.

Step 6. Most of the background should now be completely white, but to make sure that it is select the Dodge tool and change the strength to 8% and the range to highlights. Now use the tool and go over the background.

Step 7. Using the Levels tool, hold down the Alt key and click on the highlight marker. The background should be completely white. Any small patches that aren’t should be black. Make a note of the position of these areas and then go back and use the Dodge tool on them again.

Step 8. Finally, lighten the midtones of the portrait using the midtone slider in the Levels control.

The final image still has black tones, but the shadows are kept to a minimum. The background is now white and the subject’s skin is bright, but with no completely burnt-out white areas.


