
An understanding of sharpening is essential in order to get the most out of your digital images. We show you how applying some advanced techniques can take your sharpening to the next level

Notice how this detail-rich landscape has been transformed using this technique. An ordinary Unsharp Mask pass is fine most of the time, but this technique has increased the contrast between neighbouring pixels more effectively, giving the scene a crisper, three-dimensional quality without looking unnatural
Once the basics of image sharpening have been understood, it is time to look at some more advanced post-capture sharpening techniques using image-manipulation software. Some of the techniques detailed here can be used in combination with each other, so don’t be afraid to experiment.
For the majority of these techniques, Adobe Photoshop CS3 has been used, but most comparable image-manipulation programs offer similar functionality.
If you’re planning to try out these techniques on any JPEG files, make sure that your camera has been set to its default, or minimum, level of sharpening.
Similarly, if you are shooting in raw mode, set the sharpening of your raw-conversion software to its minimum before converting the file and opening it in your chosen image-editing software.
Sharpening for detail
We explained in our earlier article on sharpening how important sharpening is for bringing out fine detail, but there are occasions when your images will benefit from more than just a single application of Unsharp Mask. This technique works best on images that contain no noise but a lot of detail, such as landscapes and cityscapes shot at low ISO settings. It is especially effective for images that are destined to be printed onto matt paper, because the contrast between the different colours in the image is increased. This helps to compensate for the loss of vibrancy and sharpness that sometimes occurs due to the absorbency of the media.
Sharpening for detail step 1

Open the unsharpened image and perform any necessary adjustments, such as Levels or Curves and any spotting or cloning that may be required. Once this is done, apply a heavy Unsharp Mask pass (Filter>Sharpen>Unsharp Mask) using an Amount of 300%, a Radius of 0.8 pixels and a Threshold of 1 as a starting point. Click OK.
Sharpening for detail step 2

The image will probably look horribly oversharpened at this point, but don’t worry, we’re going to address that now. Select Edit>Fade Unsharp Mask and set the mode to Darken. Leave the opacity at 100% for the moment, but as you get more confident with this technique you can fine-tune the effect by adjusting this slider. For now, just click OK.
 Sharpening for detail step 3
The image should look a lot better now, but another application of Unsharp Mask will finish it off.
This time, though, subtlety is the name of the game.
Setting an Amount of 200%, a Radius of 0.3 pixels and a Threshold of 3 will ensure that detail is sharpened.
Sharpening for detail – Top tips
This technique greatly enhances the appearance of luminance noise, effectively by turning each ‘grain’ black. For this reason, it is best to avoid applying it to noisy images, although, as with all sharpening methods, good results can often be achieved by working selectively on the green channel only, or the Lightness channel in LAB mode (see Top Tip on page 41).
Selective sharpening

When dealing with images that contain different scene elements, applying a uniform sharpening adjustment might not be appropriate. For a portrait such as this one, for example, it is not advisable to sharpen everything, because sharpening can accentuate the appearance of blemishes and wrinkles.
The following technique can be used with any type of sharpening, but we are going to apply a high-pass sharpening filter selectively to the model’s eyes, mouth and jewellery. For the sake of simplicity we are using the Erase tool here, but more confident readers might consider using the Quick Mask tool found in Photoshop and similar programs.
Selective sharpening step 1

After making any necessary colour and tonal adjustments, and performing any spotting or cloning that is required, duplicate the background layer (Layer>Duplicate Layer) and name it if you like.
We’ve called ours ‘Sharp’. Now set the blending mode in the Layers palette to Overlay.
 Selective sharpening step 2
Click on the new layer if it isn’t already selected, then go to Filter>Other>High Pass.
A window will open showing a greyscale version of the image with only the edges visible.
Don’t worry too much about the best Radius value to enter, the effect can be fine-tuned later.
As a guide, between 1 and 3 pixels works well, and you shouldn’t exceed a Radius of 10 pixels. Click OK.
Selective sharpening step 3

With the Sharp layer selected, use the Erase tool (E) to erase the parts of the image that you don’t want to be sharpened. If you like, you can adjust the Radius and opacity of the Erase tool to ensure smooth edges to the areas that are being ‘painted out’. This can be laborious, but clicking the eye icon on the background layer makes it invisible, so you can see what you’re doing more clearly. When you’ve finished, adjust the opacity of the sharpened layer if necessary, then flatten the image (Layers>Flatten Image) and save.
Selective sharpening step – Top tip
Remember that your computer screen is a relatively coarse display surface. If you intend to make a large print, you should sharpen your image a little more than appears necessary on screen when the image is viewed at 100%.
Sharpening noisy images

In the previous article on sharpening, we said that sometimes it is best not to sharpen noisy images in case the noise is accentuated to the detriment of image quality. This is true for uniform sharpening, but it is possible to get good results by selectively sharpening only the green channel. As there are twice as many photodiodes sensitive to green light on a camera’s sensor than those that are sensitive to red or blue, there is always more data in this channel, and it is much ‘cleaner’ than the other two, with considerably less noise. This makes it ideal for sharpening.
Sharpening noisy image step 1

The first thing to do is to reduce the noise in the image as much as possible. For this shot, I used a colour blurring technique. I made a duplicate layer, blurred it by 5 pixels using the Gaussian Blur filter, and blended the layer to Colour before flattening the image.
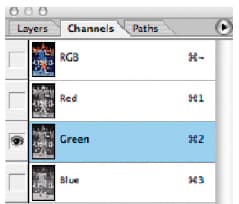
 Sharpening noisy image step 2
After performing noise reduction and any other adjustments, go to the Channels display (Window>Channels) and select the green channel.
The image will switch into black & white.
If you’re curious, take a look at the other two channels, and notice how much blotchier they are than the green channel.
That’s why we don’t want to sharpen those layers.
 Sharpening noisy image step 3
Apply a medium USM pass (Filter>Sharpen>Unsharp Mask) of 300%, Radius 0.8, Threshold 3.
Then return to the Channels box and click RGB.
Combined with the other channels, the image should now be crisper, but not too noisy.
Sharpening noisy image – Top tip
Another good way of sharpening noisy images is to switch to LAB colour mode (Image>Mode>LAB Colour) and sharpen the Lightness channel.
When you’ve finished, just switch the image back into RGB mode.


