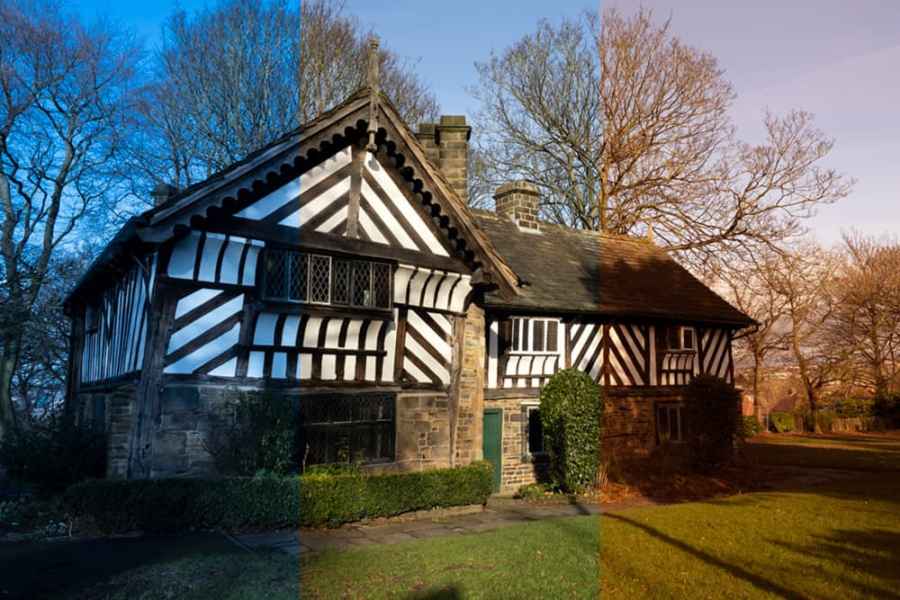
Welcome to the AP Improve Your Photography Series – in partnership with MPB – This series is designed to take you from the beginnings of photography, introduce different shooting skills and styles, and teach you how to grow as a photographer, so you can enjoy producing amazing photography (and video), to take you to the next level, whether that’s making money or simply mastering your art form.

Each week you’ll find a new article so make sure to come back to continue your journey. The start may seem basic to some photographers, but it’s an important step in making sure you’re comfortable with your equipment and the basics of photography, as it’s part of the foundations that help build into great photographs, and once you know these, you’ll be able to play with them, and understand further articles in this series.
Complete guide to white balance, including presets, colour, mixed lighting, and how to control white balance
In photography, everything is about balance – from composition and exposure, to colour – and a tiny tip of the scale can often produce less-than-desirable results. White balance certainly falls into this category, and remains at the forefront of how the colours in your images are balanced and, indeed, how successfully your colour images convert to black & white. Colour balance, in a nutshell, can make or break an image.
In a photographic world where so much can be adjusted post-capture, the temptation can be to shoot now and fix later, but whether you shoot images in raw or JPEG, there are many reasons why setting the correct white balance at the point of capture is the best way to work.
What is white balance?
White balance ensures that white or neutral tones are represented as white or neutral, respectively, in the resulting image regardless of the light source used to illuminate the scene. And in doing so, the camera can also show all other colours in the scene correctly.
By simply setting the correct white balance according to the light source or in some cases weather conditions, the image will be free from colour casts. You can let your camera set the white balance for you on “Auto”, but to get better colour in challenging lighting conditions it’s worth knowing how to change these settings.
White balance is a setting that has been available to video cameras for decades, but it was the advent of digital photography that brought these settings to stills cameras. Previously, photographers would use either daylight or tungsten-balanced film, with the former being used in conjunction with corrective screw-in filters for other light sources such as fluorescent lights.
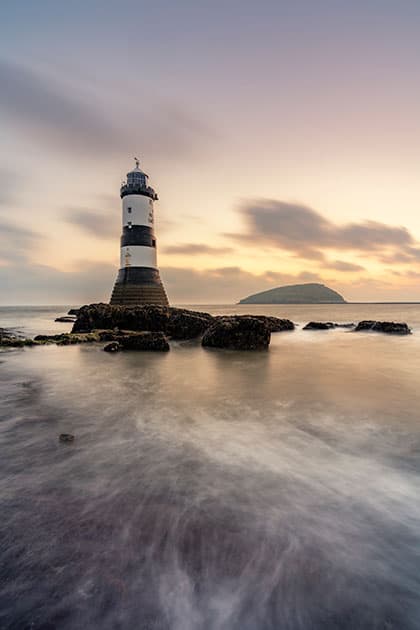
The golden hour can be a tricky time to select the correct WB setting. Sony A7R III, 16-35mm, 13sec at f/13, ISO 100. Credit: James Abbott
What about white balance presets?
The white balance settings available on most cameras include presets: Auto, Daylight, Incandescent/Tungsten, Fluorescent, Flash, Cloudy, Shade, Custom and Colour Temperature. The latter allows you to set white balance manually in Kelvins and is most useful for situations such as correcting white balance in-camera when shooting with filters like the Big Stopper, which typically add strong colour casts to images.
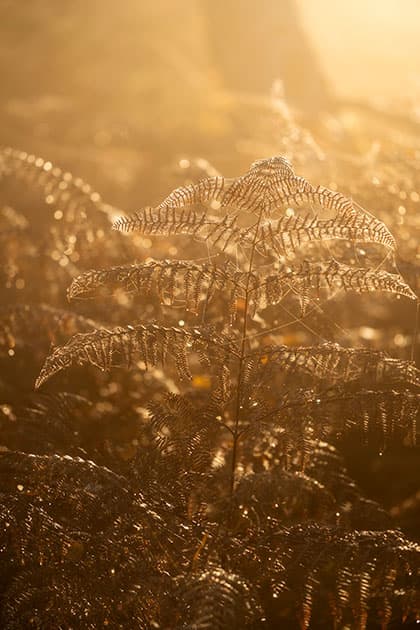
Golden light on bracken on a misty autumn morning. Sony A7R III, 70-200mm f/4, 1/320sec at f/4, ISO 100. Credit: James Abbott
In reality, though, you don’t need all these settings and the sheer number of them makes white balance appear to be much more complicated than it really is. Going back to shooting film, just two types of film and one or two corrective filters for the two types of fluorescent lights were all you needed and this simplicity can be applied to digital photography alongside some more advanced methods of ensuring correct colours.
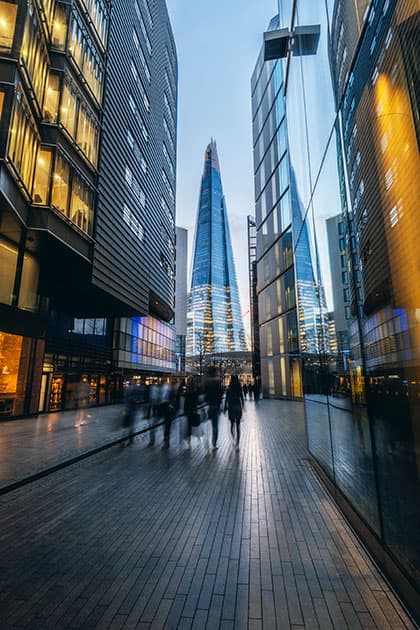
The Shard during twilight with a mix of light sources. Nikon D610, 16-35mm, 1sec at f/11, ISO 100. Credit: James Abbott
How do I avoid colour casts?
Think about when you’re outside at night and you look at your house; the light inside appears yellow, but when you’re in a room at home the light appears white. This occurs because the eyes adjust to colour temperature automatically. When you’re outside at night your eyes will have adjusted to the ambient light, which is why you would now see the colour of the light source.
Cameras, on the other hand, need to be told how to ‘see’ and record light correctly to avoid colour casts. A colour cast is simply a colour shift across the whole or part of an image which gives it an unattractive tinted appearance. Colour casts typically occur when you take an image with the camera set to the incorrect white balance. For instance, shooting indoors under fluorescent light but with Daylight white balance set gives off a greenish light. Since the camera is set to Daylight, which is for ‘white’ light, the camera will record the colour temperature of the artificial light source rather than neutralising it. If you were to shoot outside in the daytime and had white balance set to Incandescent, the colour cast would be blue.
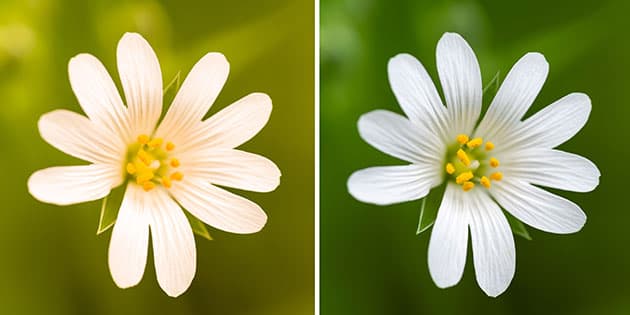
There are many ways to correct a colour cast – from getting it right in camera to fixing it at the post-production stage. With colour cast (left) and without (right). Credit: James Abbott
With the exception of shooting indoors, where setting the correct white balance for the light source is essential to avoid a colour cast, using Daylight white balance will actually see you through the vast majority of situations. You’ll notice that your camera has settings including Shade and Cloudy, but quite often these can warm your images up too much.
In the majority of cases, photographers use these settings to creatively warm up their shots in-camera, so they can see the result on the LCD screen. If you’re shooting raw you can, of course, change white balance and warm images up or cool them down during post-processing, and this is a tried and tested method of creatively using white balance.
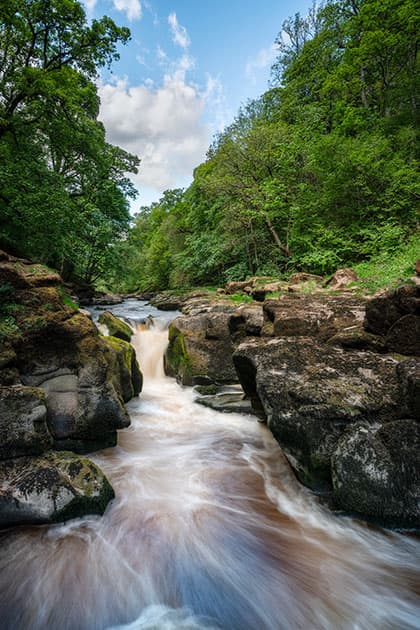
This was taken in the middle of the day in white light. Sony A7R III, 16-35mm, 0.8sec at f/13, ISO 100. Credit: James Abbott
Raw vs JPEG
When shooting in raw it really doesn’t matter what the white balance is set to because you can easily correct it during post-processing without any detrimental effect on image quality. However, it’s still best to have white balance set correctly while shooting because it makes reviewing images on the LCD screen more effective since colours look correct.
When shooting JPEGs, on the other hand, it’s much more important to set the correct white balance – and especially if you tend not to edit your images. However, the availability of the Camera Raw Filter in Adobe Photoshop does mean that you can change white balance as easily as you would with a raw file, but it remains better to set the correct white balance at the point of capture because you’re not manipulating the pixels that make up the image.
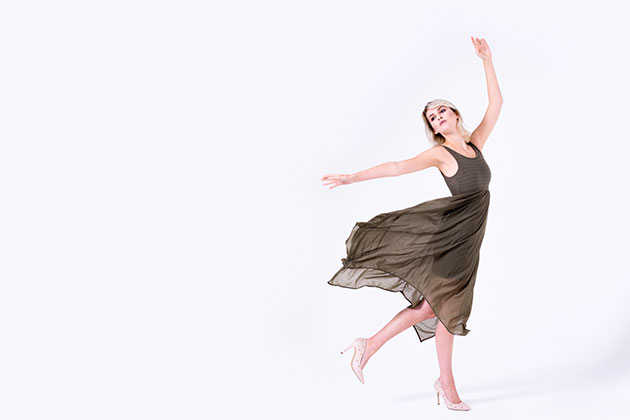
The WB setting of a white background is easy to correct. Nikon D610, 50mm, 1/125sec at f/8, ISO 100. Credit: James Abbott
Working in difficult conditions – mixed light sources
The most difficult conditions you’ll ever find yourself working in are those where there are mixed light sources. This is problematic because you have two or more light sources with different colour temperatures, and setting a white balance preset to deal with one light source means that the other light source will create a colour cast.
There are two main ways to deal with this: one is to use Auto white balance, and the other is to create a custom white balance. Auto white balance will assess the scene and attempt to come up with a white balance that neutralises the light in the scene, and in most cases will do a reasonable job – but more often than not it’s far from perfect because it creates an average. In fact, Auto white balance can be a tempting setting to use in many, if not all situations, because as the name suggests it sets the white balance automatically, so that’s one less thing to worry about. The problem is that it simply tries to neutralise light, so if you’re shooting a sunrise, or sunset, for instance, the image will appear subdued or even blue.
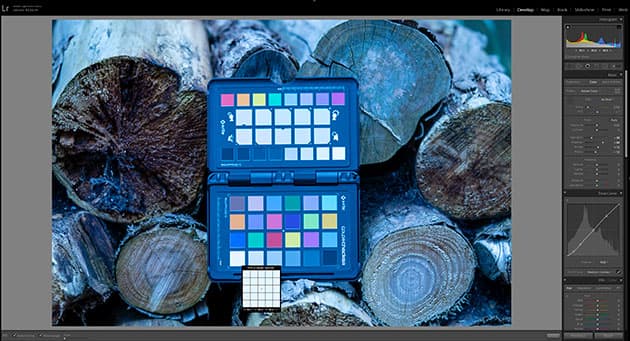
The most effective way to deal with mixed lighting is to set a custom white balance where you take a shot of a white card (could also be a piece of A4 plain white paper) under the light conditions in which you’ll be shooting. You’ll find that this will provide even more reliable results than using the presets.
How to use a colour checker
Credit: James Abbott
1. Take your shots
Set up your shot and take one with the colour checker in the scene, then remove and continue shooting. Load your images into your raw-editing software and select the one with the colour checker before using the white balance dropper to click on the white square.
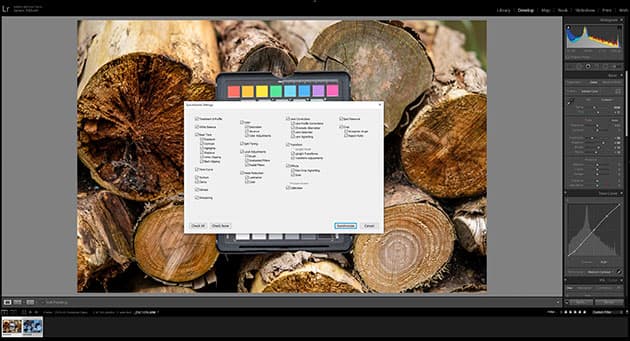
Credit: James Abbott
2. Copy settings
Keep the reference image selected, hold down the Shift key and select the main image(s). Click on the Sync button making sure WB is checked. Click Synchronize or OK. This will copy the white balance settings so that your images without the reference card adjust too.
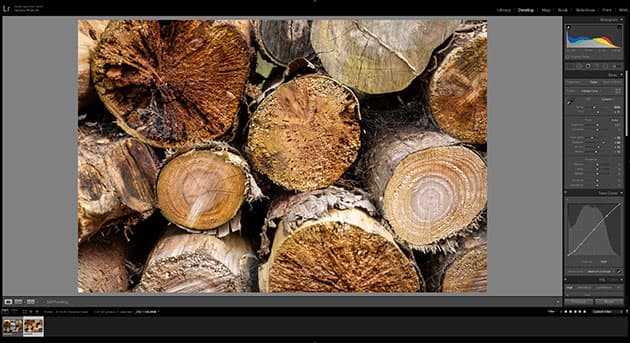
Credit: James Abbott
3. Get perfect white balance
The result will be 100% perfect white balance. The colour checker is great for studio use because studio flash colour temperature varies from one brand to the next. The colour checker is also great for any subject under any lighting – even when using a Big Stopper.
How to set a custom white balance
Credit: James Abbott
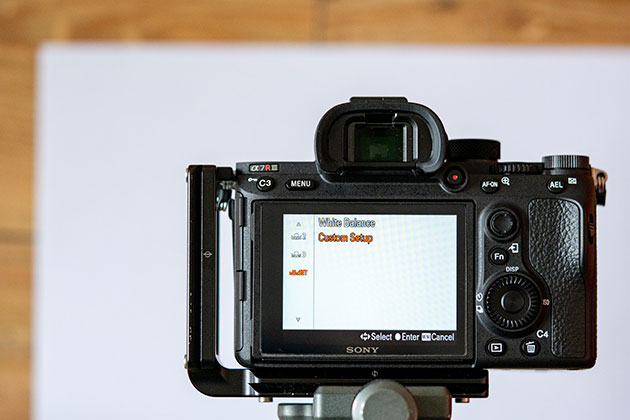
1. Select Custom
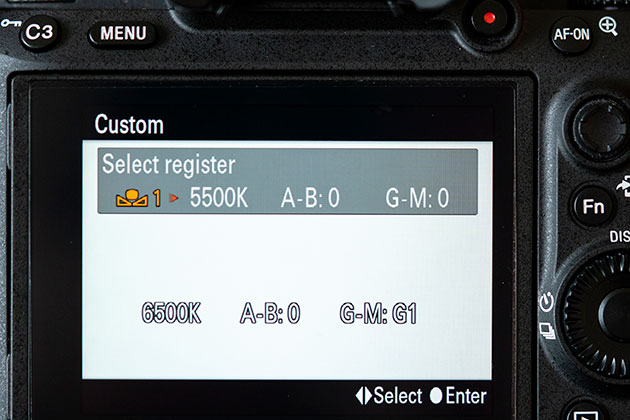
Enter the menu or use the relevant direct access button to bring up the white balance options on the LCD screen. Scroll down to Custom, usually at the bottom, and press OK. This will take you through to a screen where you need to shoot a reference image.
Credit: James Abbott
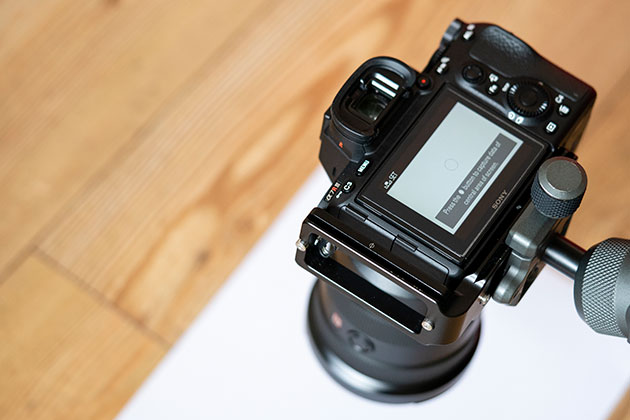
2. Fill the frame
The camera will now ask you to shoot a reference image of something white. Use a sheet of white paper and place it in front of the camera. Look through the viewfinder and fill the frame before pressing the shutter button or another button as directed by the camera.
Credit: James Abbott
3. Confirm custom setting
Once the reference image has been taken, most cameras will take you through to a confirmation screen to accept the custom setting you’ve created. A custom setting should be created each time you shoot because they are specific to the light conditions at that time.
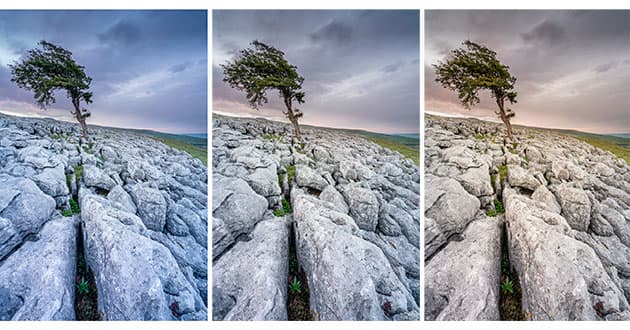
Cool (left), neutral (middle) and warm (right). Credit: James Abbott
Cool, warm and just right
One of the advantages of white balance is that when used creatively, it can change the overall look and feel of images. In the examples here, you’ll see how simply using the Temperature slider in Lightroom or Adobe Camera Raw (ACR) can be used to make the images look colder (bluer) or warmer (yellower). To maintain realistic-looking results don’t push the slider too far because you’ll end up with an unattractive colour cast rather than making the shot look like it was taken at the blue hour or the earlier part of a sunset where the light appears warm.
The visible light spectrum
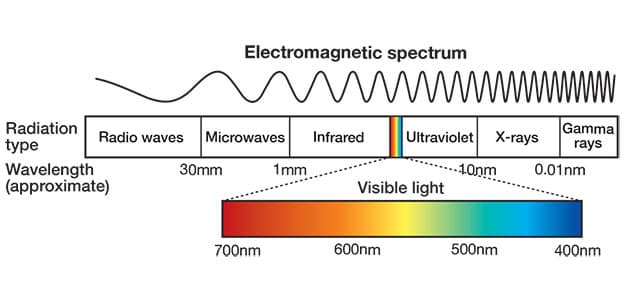
Light is a form of electromagnetic energy, and the visible spectrum is made up of violet, blue, green, yellow and red. These colours combine to make white light, which is typically what you’d get outdoors around midday and from flash.
The colour temperature of light obviously falls within this spectrum, and understanding how white light is made up of these constituent colours can be useful when working with different light sources, coloured gels, and when shooting at sunrise and sunset.
Colour temperature and the Kelvin scale
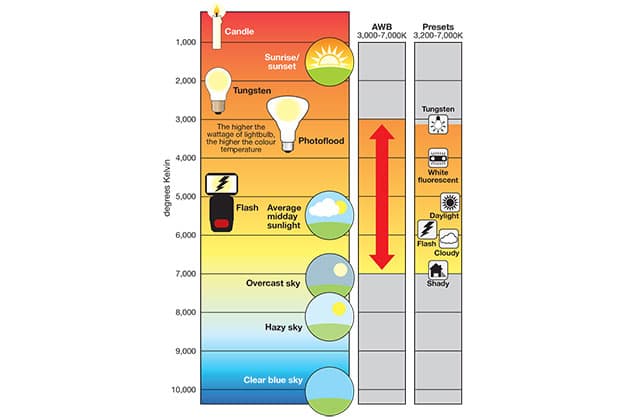
Colour temperature is measured in kelvin – a measurement of temperature most commonly used in science which starts at absolute zero, with no minus figures like Celsius or Fahrenheit have. At one end of the scale, we have orange light at 1000K, going all the way up to blue light at 10,000K, as the diagram above illustrates.
We often refer to colour temperature and light sources from a subjective point of view: red, orange and yellow light are referred to as hot, while blue or green light are considered cold, but the reality in terms of kelvin is actually the opposite.
If you’re struggling with white balance and want some extra help, here are some tools that can help:
White Balance Kit list
- ExpoDisc2.0 – This white balance tool comes in several filter-thread sizes and attaches to the front of lenses to provide a quick and easy way to set a custom white balance and to set a perfect exposure based on 18% grey.
- X-Rite ColorChecker Passport Photo 2 – This pocket-size colour reference comes in a small hard case to keep the colour patches safe during transportation in your bag, and includes an 18% grey and a white balance target. This is a great tool in the studio and on location.
- Lastolite/Manfrotto Ezybalance – This foldable accessory provides a white surface on one side and 18% reflectance grey on the other for accurate manual white balance and exposure. The 30cm option is small enough to take anywhere.
James Abbott is a landscape and portrait photographer based in Cambridge. He’s also a freelance photography journalist and editor specialising in photography techniques, tutorials and reviews.
Tune in next week, for the next article in the series of the AP Improve Your Photography Series – in partnership with MPB.
- Part 1: Beginners guide to different camera types.
- Part 2: Beginners guide to different lens types.
- Part 3: Beginners guide to using a camera taking photos.
- Part 4: Beginners guide to Exposure, aperture, shutter, ISO, and metering.
Find the latest Improve Your Photography articles here.

