Use low-powered lights to illuminate objects in a darkened room
A pitch-black room can provide similar opportunities to shooting outside at night, but on a smaller scale.
With small lights, such as torches, LEDs and even laser pointers, it is possible to produce both natural and creative lighting effects using methods similar to those we used outside.
The technique is the same – with the camera on a tripod, set a long exposure and use your chosen light to illuminate parts of the scene as you see fit.
Lighting an area

Lighting an area
In this shot, a torch was used to light the flowers and stem.
Following the shape of the subject with the light has created a gradual fade from red to black in the shape of the flower.
This is something that would be tricky to replicate using studio flashlights.
Lasers

Lasers
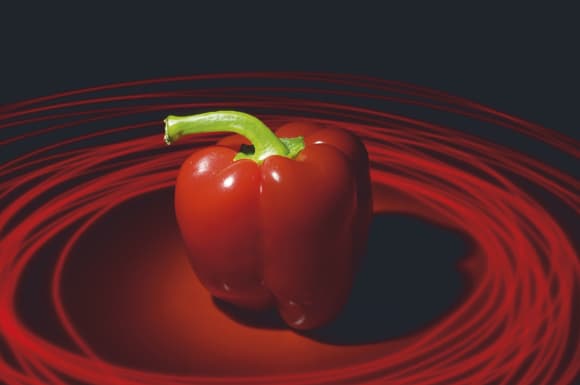
Two different light sources were used for the main image of a red pepper.
I set the pepper onto a piece of red acrylic in front of a black cloth, and set the camera’s exposure to 15secs at f/14 and ISO 100.
Using a torch, I lit the pepper for around 3secs, directing the light onto the subject from around 45° above and to the side.
The red swirls around the pepper come from a red laser pointer. For the remaining exposure time I circled the laser beam to illuminate the acrylic around the pepper, which creates the lines that appear in the final image.
Theatrical light effect

Theatrical light effect
A simple torch can be used for many effects. In the example below, I have used an LED torch as it produces a ‘clean’ light and is usually more precise than a conventional tungsten bulb torch. The rose has been placed on black acrylic against a black cloth in a darkened room, and the exposure on the camera set to 13secs at f/22 and ISO 100.
With this long exposure time to play with, I set the torch to its lowest power setting and pointed it at the rose, constantly moving the torch, out of shot, to illuminate the flower.
For the most part I pointed the torch down, at about 45°, which has created the studio spotlight effect. I then angled the light straight on to illuminate the head of the rose and fill in a few harsh shadows.
This technique has replicated the effect of using studio lights with snoots and grids to create a precise, dramatic lighting style.
Light trails

Light trails
We’ve all seen images of traffic trails, where the movement of a vehicle at night produces trails of light that are captured over a long exposure. This technique is similar except it captures the movement of a small LED light.
The subject was photographed against a black background, then using an exposure of 30secs at f/5.6, a small white LED light was moved around the outline of the subject. The quicker the light was moved, the thinner and fainter the line. Moving slowly creates thicker, brighter lines.
LEDs
LEDs are found in many household products and I managed to salvage one from an old solar-powered light. They have the advantage of being small, powerful and the light produced is reasonably directional. This makes LEDs perfect for lighting small still-life scenes.
 I soldered wires to the +/- terminals of the LED and taped three small batteries together. I soldered one of the wires to one side of the battery pack and left the other unattached. Pressing the wire to the battery makes the LED light up. Only attempt this if you feel confident doing so and only using low-powered batteries.
Top tips
- Use different light sources for different effects. Besides a different colour temperature, torches with tungsten bulbs tend to have a wider spread of light compared to LED torches. LED torches are often more precise and have a colour temperature closer to neutral. For very precise control, some torches have a focused lens to control the beam.
- Coloured gels can be placed over the light source to illuminate parts of the subject with different colours. Multiple exposures or merging the images using software can aid this technique.
- A keyring torch can be useful for creating light trails instead of an LED.
- Keep the light source moving as much as possible, even if the movement is slight. This prevents the light looking
too harsh in the final image. - If you cannot work in a pitch-black room, make sure your exposure is short enough that any ambient light doesn’t illuminate the scene.


