Raining again? Don’t let that stop you going out with your camera, see our step by step guide to photographing raindrops for some shooting advice…
 Step one: Get close
Because of their small size you’ll need a macro lens or the close-up facility of a compact camera to make a real statement out of raindrops.
Use a tripod. Admittedly they can be a bind to carry and set up, but with close-up work you really do need one: to keep the camera rock steady, to free up your hands and to maintain a constant camera-to-subject distance.
This is important as a reduced depth of field will allow for no focusing inaccuracies.
Step two: Background and depth of field
When shooting raindrops (or any still-life) aim to delineate your main subject from surrounding distractions. There are at least two ways you can do this:
1) Adjust your shooting angle to select a simple background that contrasts in tone with the subject. A mid-tone or darker one will help the raindrops stand out.
2) Set a large aperture to completely blur the background, so the object will be in sharp focus. A polariser may also help clarify the scene by removing surface glare and deepening colour.
Step three: Set exposure and white balance
Spend some time now getting your white balance right. However, if you shoot in the Raw file format you’ll be free to adjust it later. Think about using a grey card to help set exposure.
Switch your camera to manual mode and place the card in view so that it is in the same light as your subject. Once the correct exposure is ascertained it’s handy to know that it will remain valid as long as the light levels remain constant. This saves a lot of potential work.
 Step four: Focus & depth of field
Here’s the crucial bit: focus accurately on your subject and think about what exact plane needs to be sharp.
In other words – where do you want the viewer’s eye to settle? If autofocus proves ineffective during this process, switch to manual.
Also remember to check depth of field. If your camera has it, depress the depth of field preview button to get an idea of what the zone of sharpness will cover in the final shot. To avoid camera shake, use your camera’s self-timer function to take the image, rather than pressing the button yourself.
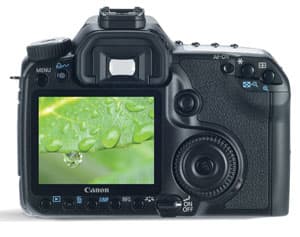
 Step five: Review your results
LCD screens can give a false impression of image sharpness so it’s vitally important that after taking a picture you use your camera’s zoom facility to review the shot in close scrutiny.
If the results aren’t as they should be, then identify the problem and shoot again.