Technique Explained: Fill-In Flash At Night

Using a flashgun to light a night-time portrait can produce some wonderfully atmospheric images.
Yet without a continuous light source it can be difficult to see how to light a shot and, more importantly, how to expose an image.
Many inexperienced photographers rely on the automatic settings of their camera and flash, but often these pictures don’t represent the atmosphere of the location where the image was taken.
However, it isn’t as difficult as some people think to correctly use a flash to create an atmospheric night portrait, particularly given the advantages of modern DSLRs. For starters, you are able to see the image you have just taken, so the exposure and flash power can be quickly adjusted.
There are also a number of automated features, such as TTL flash metering and flash exposure compensation, that make setting the correct exposure easier. With most manufacturers offering cameras and flashguns with wireless capabilities, it is easy to become more adventurous when using flashguns.
AmbientAs we all know, taking night-time images without a flash requires long exposures and this can lead to camera shake. Of course, using a tripod can help, but you also have to make sure the subject remains still to avoid becoming blurred – and that’s not easy. The alternative is to use a lens with a large aperture that allows more light to enter the camera and thus reduces the exposure time. When a lens is at its maximum aperture, though, images will obviously not be at their sharpest and the depth of field may be so shallow that not all the subject is in focus. Increasing the sensitivity setting can help reduce the necessary exposure time, but don’t forget that it can also severely affect the amount of noise in the image. |
 |
On-camera flashIf there is not enough light to correctly illuminate a subject, it can be tempting to simply use a camera’s built-in flash and select an automatic exposure setting. Most camera flash systems fire a pre-flash that allows the camera’s TTL system to communicate with the flash and tell it the power output needed for a correct exposure. Usually the results are good, with a nicely exposed subject. However, the direct light from the flash looks unnatural: we are used to seeing things lit from above by the sun or by ceiling lights, not from light at head height. The direct on-camera flash also increases the likelihood that the subject will suffer from redeye in the pictures. The automatic exposure mode may also not take the ambient light in the background into account, leaving a large black space behind the subject. With little or no ambient background light it becomes difficult to put the subject in any context, and it isn’t representative of the scene at the time. |
 |
Ambient and flashIn-camera TTL flash is designed to light the subject, but it does not meter for the ambient background light. To create a more atmospheric shot, the exposure time should be long enough to allow the ambient light in the background to register. Due to the extremely short duration of the flash, it is the aperture setting, rather than the shutter speed, that will affect the flash exposure. In the above example, I was happy with how the flash illuminated the subject, so I used the same flash and aperture settings as in the on-camera flash image (second image). However, I adjusted the shutter speed so that rather than being 1/250sec it was 1/4sec. This shutter speed is closer to the exposure time of the ambient light image (first image). By combining the aperture used in Image 2 with the shutter speed from Image 1, both the subject and the background are nicely illuminated, creating a more pleasing image. However, there is still the issue of the direct on-camera flash looking a little unnatural. |
 |
Off-camera flashIf you want to take the technique a step further, use an off-camera flashgun. Place the flash at around 45° from the front of the subject, in the 10 o’clock or 2 o’clock position. Keep the flashgun above the height of the subject and angle it down so that it is pointing towards the subject’s nose. This should avoid the ‘rabbit in headlights’ look that direct in-camera flash can produce. Expose the picture as explained in the third image. A wireless or cable TTL flash usually produces good results. However, if you are not happy with the flash result use flash exposure compensation to get the image you want. When using a fully manual flashgun refer to the flash guide number (GN) chart, which can usually be found on the rear of the flash or in the manual. Use this to work out the correct flash power and aperture based on the distance between the flash and the subject. Once the correct aperture and power have been calculated, meter for the ambient light to calculate the correct shutter speed |
|
Backlighting

You can use the same mixture of flash and ambient lighting to create interesting effects. Rather than relying on the ambient light of the scene, you can create your own. Whether it is car headlights, as shown here, or Christmas decorations, try to create you own backlighting effects using a burst of flash to light your subject.
Amateur Photographer: Top Tips
- If you don’t have a lighting stand for a flashgun, hold the flash yourself, put the camera on a tripod and use a remote release or self-timer to trigger the camera.
- Using light modifiers, such as a diffuser, or small softbox for a more flattering portrait.
- If using on-camera flash, try folding some tracing paper over the flash to make a small diffuser.
- Make sure the WB is set to the flash setting. The subject’s face is the most important part of the image and it will be lit using flash.
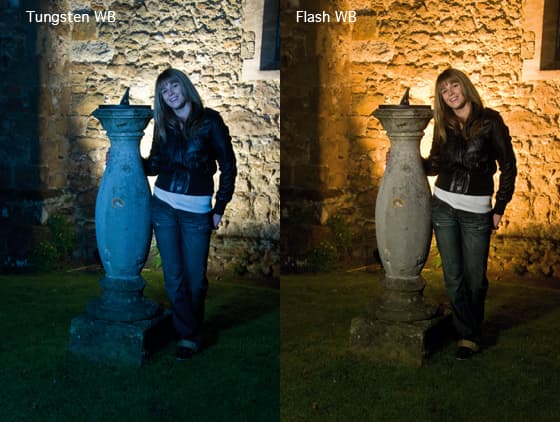
White balance

When taking shots at night, you will probably have a number of different light sources in the image. These might include sodium streetlights, halogen, fluorescent or tungsten lights in shop windows, as well as the flash you are going to use to light your subject.
It may sound obvious, but when using a flashgun make sure you set the white balance, either in-camera or in a raw editor, to ‘flash’. With lots of other light sources around it may be tempting to use a white balance for tungsten, for example, to reduce artificial colours. However, if you do this your subject will become very blue.
Remember that the subject of the portrait is the focal point and that person must be correctly colour balanced. Don’t forget that you can also perform a selective colour balance adjustment using image-editing software.
Selective colour balance adjustment
|
Step 1. In this image, I want to reduce the orange tungsten lighting on the wall in the background. As the subject is the focal point, the image was shot using the flash white balance setting so the subject’s face is the correct hue. |
 |
|
Step 2. To ensure that the subject’s face, hair and hands are not affected by the colour adjustment, a selection needs to be created around them. I have used Photoshop’s Quick Mask tool to do this, but equally you can use the Marquee tool. If you use the Marquee tool, make sure you invert the selection so that the background, not the face, is affected. |
 |
|
Step 3. Choose Image>Adjustment>Hue/Saturation and select Yellows. Now reduce the Saturation of the yellow in the image until the colour starts to look natural. For best results you should also reduce the saturation of the reds. |
 |
|
Results. The colour cast should now have been reduced significantly, but without affecting the subject’s skin tone. In this image it has been fairly straightforward to reduce the tungsten light, but very complex lighting arrangements may require much more masking or selection of areas to become neutral. Also, remember that you don’t always want to remove all colour from ambient light as in some images it helps to create an atmosphere. |
 |