It’s about as testing a subject as you can get, says Mat Gallagher, but the results are the reward.
 Live-music photography is a testing subject, as composition, lighting and focus are always changing, and often with very little light to play with.
With some simple tips, you can lessen the challenge.
With a little practise, you’ll soon be taking images you can be proud of.
ISO
The range of ISO sensitivities available on a digital camera is of great benefit to the live-music photographer. Image quality at higher settings has been greatly improved to make them useable for creative work, though you should always keep your ISO set to the lowest value possible.
Once at your location, set an ISO value and look at the shutter speed given (in aperture priority with the maximum aperture set).
To avoid camera shake, keep the fraction greater than the lens’s focal length, so faster than 1/50sec for a 50mm lens, for instance. As your subject is likely to be moving on stage, though, you should always aim for at least 1/200sec. Adjust your ISO setting until this is reached. For well-lit concerts, between ISO 3200 and 6400 is normally sufficient.
Aperture
Although stage lights may appear quite bright, the overall exposure can be very dark compared to shooting outdoors, so it is important to squeeze as much light into the camera as possible.
The best way to do this is to use a wide aperture, so rather than leaving your camera in its program mode, switch to aperture priority (A or Av) as this will allow you to manually set the widest aperture on the lens, which may be f/2.8 or f/3.5 on standard kit lenses.
Using a wide aperture will reduce the depth of field, but this can sometimes help remove untidy backgrounds.
If using a wider aperture than f/2.8 (such as f/1.4), you need to focus carefully as even the distance between the microphone and the singer may be the limit of the depth of field. For fast work, keeping the aperture at f/2.8 is often safer.
Lens choice
 Your choice of lens can depend on the venue you are in, or more crucially, how close you are able to get to the action.
If there is the opportunity to get up close to the musicians, take advantage of it and use a wide lens to get more of the scene in shot, as this will add impact. A 10-20mm lens on an APS-C-format camera is ideal.
If you are photographing from the crowd, try a longer lens, such as a 70-200mm. These can also be useful when you are closer to the stage, for capturing close-ups or band members further back.
Just as important as the focal length is the aperture. So called ‘fast lenses’ are those with maximum apertures of f/2.8 or wider. These allow more light to reach the sensor, which keeps the shutter speed faster, reduces blur and, in many cases, speeds up focusing.
An ideal kit for live music photographers may include a full-frame camera body with 16-35mm f/4, 24-70mm f/2.8 and 70-200mm f/2.8 lenses. This is expensive gear if you are just starting out, however, and adding a cheap 50mm f/1.8 optic to your standard lens will give you plenty of options.
Focusing modes
Autofocus is becoming more advanced on even budget digital cameras, allowing not only continuous focusing but also focus tracking. These are extremely handy for moving subjects as they allow the camera to adjust the focusing while the button is half-pressed, and even to lock onto a subject and follow its position around the frame.
The problem, however,is that, with the exception of some more expensive models, these systems can struggle to keep up in the low-light conditions of the stage. So rather than helping, they can cause mis-focusing and leave you with a bunch of blurry shots.
If in doubt, keep your camera in single focus mode and use the half-press of the shutter button to refocus when your subject moves. In very low-light situations, using manual focus may be the only reliable option, but this takes practise if you are to focus fast enough for live work.
Using flash
For most professional performances flash is not permitted, but even if it is, it should be avoided whenever possible.
Using flash can be distracting for the performers and for the crowd, and it can ruin the ambience of your image. The one time you may need to use flash is if the stage is poorly lit and the subject is dissappearing into the shadows. In this case, use a diffuser over the flash, keeping the ISO setting high and aperture wide to maintain some of the background colours.
Flash compensation can also be used to balance the subject and background.
Getting the photo pass
The key to getting access to the elusive photo pit is to start small. Try photographing local acts in small venues – most of these won’t mind you taking a camera along, and you can chat to the band afterwards.
Offer to send them some shots, which they are likely to appreciate if they are just starting out.
Once you have some experience at this level, you can start to look to slightly bigger venues that have local bands performing. Use this to build up a portfolio of images, and then try approaching music venues or tour managers.
The big-name acts are unlikely to have space, but smaller or more niche artists might just let you photograph them. Koko in Camden, London (www.koko.uk.com), encourage photographers to apply to photograph their ClubNME night, which often features some big acts.
Positioning and framing
How you choose to frame your shots will come down to personal preference if you are just shooting for yourself, but as with any type of photography it is worth looking through some examples for inspiration.
Some live shots can appear very static, so try and capture your subjects with some movement in them. Often this will be when they move away from the microphones, and it will also allow you a clear shot of their face.
If you are photographing someone singing, move to the side so the microphone and stand isn’t completely blocking your view.
There are many rules you can follow but sometimes breaking them can produce even better results, so it is better to have an idea of the shots you like and even create your own style.
What else to shoot
The musicians are not the only interesting subjects to photograph, so try capturing wider shots from further away to include more of the venue and crowd.
Passionate fans can make interesting subjects in their own right, so don’t be afraid to turn around and take pictures of them, too.
Remember, though, that without the stage spotlights they will need even more exposure, and this is where a flashgun can help.
Taking shots from further back will allow you to include both the audience and the artists, while any opportunity to shoot from higher up may give more of a picture of the venue as a whole, especially with a wideangle lens.
Editing your shots

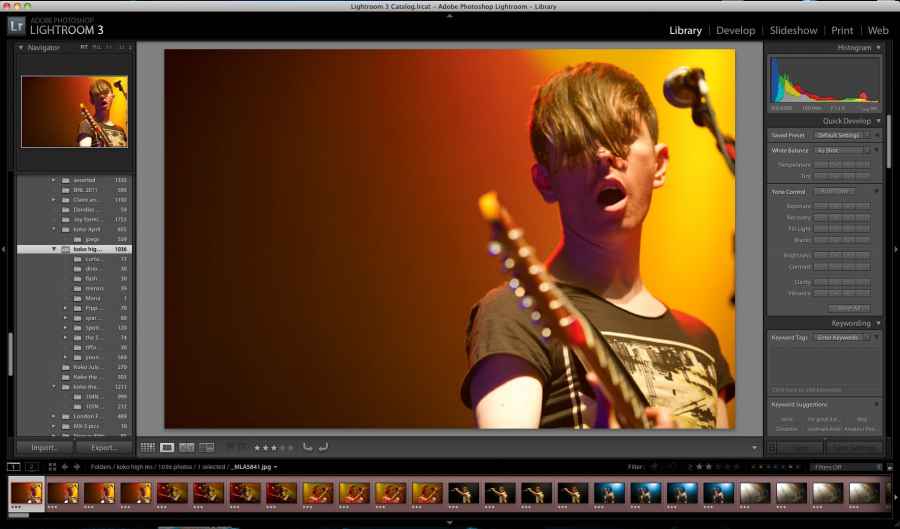
Programs such as Adobe Lightroom help pare down large numbers of images into a more manageable selection
It is easy to come away from a shoot with hundreds of images, but this leaves the laborious task of editing and picking out the good ones.
For speed, programs such as Adobe Lightroom allow you to quickly rate your images and discard the bad ones.
Once you have a manageable selection (20-30 maximum), you can start to perform basic adjustments. White balance can be tricky with lit stages so shooting in raw helps, although the AWB setting on most modern cameras will produce good results most of the time.
Use the noise reduction slider in your raw software to minimise the noise but don’t remove it altogether as this can look unnatural.
Before you output (convert) your files to JPEGs, you can add keywords to the images, such as the name of the artist, the location and copyright details. This metadata is accessible from most editing programs.
Sharing your images
Once you have a nice selection of shots, don’t keep them to yourself. Set up a Flickr page (www.flickr.com) or put them on your own website if you have one. Then make sure you send a link to the band and any potential venues or promoters.


