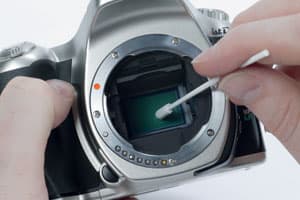
I’ve managed to get some dust on the sensor of my Nikon D70, but I haven’t yet summoned up the nerve to try to remove it, so I’ve been spending more time driving Photoshop’s Healing Brush on my PC than I’d like. I’m unsure about which is the most effective way of cleaning my sensor, so could you give me some pointers?

Nigel replies: Most people have small amounts of dust on their sensor which aren’t normally visible to the naked eye but become visible if you magnify small areas. The best way to see the dust is to stop down to a small aperture and photograph something white. Then, in your editing software, adjust the levels to increase the contrast. Any dust should now be visible.
Sending the camera away for cleaning is one option, but it’s expensive. There’s a bewildering variety of sensor-cleaning systems on the market but they must be used with utmost care to avoid damaging the sensor (or, more accurately, the protective filter covering it).
The first thing to know is that there are two types of dust: wet and dry. Dry dust will blow or brush off easily using a sensor brush (you can get these in specific sizes to match your sensor type) while wet dust requires moist swabs. Here’s the basic method for cleaning a sensor using a brush.
Stage One
Choose as clean and dust-free a room as possible, and make sure that any windows are closed and no fans are blowing. Turn on your camera, go into the set-up menu and select the ‘cleaning mode’. This flips up the mirror and opens the shutter to allow access to the sensor. (Most DSLRs have a cleaning mode. Owners of other cameras should check the instruction manual to see how to do this. If you don’t have this feature, select Mirror Lock, or manual exposure and a shutter speed of 30 seconds. Don’t select the Bulb mode and hold your finger on the button, because if your finger slips and the shutter closes you can damage your sensor, or the shutter).
Stage Two
Pointing the camera face down, blow gently into the opening using a brushless blower (such as the Giottos rocket). Compressed air is not recommended as it can spit liquid propellant, and the high pressure can blast dust into unreachable crevices.
Stage Three
Remove your sensor brush from its protective case, being careful not to touch its bristles. Use the blower to blow a few puffs of air through the bristles. This will increase the static charge on the brush and dislodge any dirt.
Stage Four
With the camera still in its cleaning mode, gently touch the sensor with the bristles and move across the sensor from one side to the other. The static charge built up on the bristles will attract the dust particles off the sensor. Repeat if necessary. Shoot another test shot to make sure that all the dust has been removed.
Stage Five
If a dust spot cannot be removed with this method, and doesn’t move from its position, you’ll need to use a ‘Wet Method’ for its removal, such as a swab. Use swabs designed for this purpose, as they are produced in a clean-room environment and come in sealed packs. Take a swab and a apply a drop of cleaning fluid (not too much or it will smear). Gently swipe the swab from one side of the sensor to the other, in a light, even motion.


