In this step-by-step, we show how you can use image-editing software to replicate the effect of a graduated neutral density filter.
Before you start:
Software: Adobe Photoshop, Photoshop Elements or similar software
System requirements: Windows PC or Mac
Skill required: Beginner
Time to complete: 10 minutes

The British weather isn’t the most reliable in the world – it can be blue skies one minute, and overcast the next. A graduated neutral density filter (or ‘ND grad’ as they are also known) can make an overcast sky more dramatic, and help to retain highlight detail.
Sadly, even the most prepared photographer sometimes forgets to pack their ND grad, but thankfully a similar effect can be replicated using image-editing software, as long as there is still highlight detail in the sky.
By using a layer mask and an original and adjusted image, it is possible to use the Gradient Fill tool to make it look like a filter was used when the image was taken. Furthermore, the digital technique is very simple and can easily be applied.
Those photographers who use Adobe Photoshop Elements, and who don’t have a layer mask facility readily available to them, can still create the effect using a simple work-around. For more details on how to make this work for you, see the box on the right.
How to create an ND grad filter
Replicate a graduated neutral density filter to help create a more dramatic sky

1. Open up the image you are going to be working on – a landscape with an overexposed (but not completely burnt-out) sky works best. Duplicate this image onto a new layer by selecting Layer>Duplicate Layer and name it ‘Darker’.

2. Make sure that the Darker layer is selected and use the Levels or Curves tool to adjust the image to make the sky darker. Don’t worry about the foreground becoming too dark; just concentrate on recovering detail in the sky.

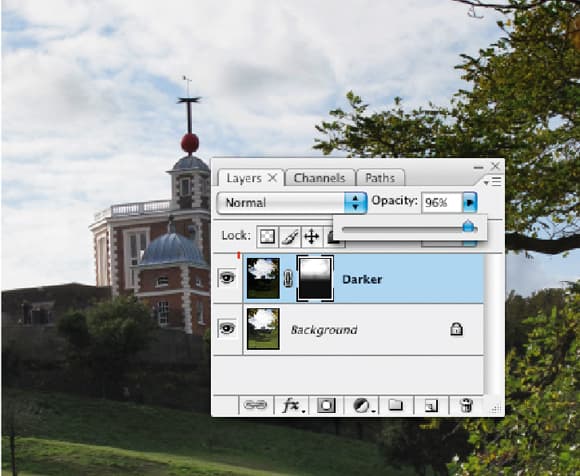
3. In the Layers palette, create a new layer mask on the Darker layer by using the button at the bottom of the palette.

4. Select the Gradient Fill tool from the Tools palette. It is found paired with the Paint Bucket tool. Select a black to white gradient.

5. Add a black to white gradient to the layer mask by applying the dark side of the gradient to the bottom of the adjustment layer. Hold down the Shift key while dragging the tool from bottom to top to keep the line straight.

6. The dark side of the gradient creates a hole in the layer mask that reveals the original layer below while leaving the darker top half on show. If the effect is too strong, repeat step 5 or lower the opacity of the Darker layer.
Adobe Photoshop Elements users
 Unfortunately, Adobe Photoshop Elements does not feature layer masks that can be directly applied to image layers. However, there is an easy way around this by applying a layer mask to an adjustment layer.
1. Carefully follow steps 1 and 2 in the main tutorial.
2. Create a new Levels adjustment layer between the Background and Darker layer, by selecting the Background layer and then selecting Layer>New Adjustment Layer>Levels from the menu. Don’t adjust any of the levels, just select OK. Next to the Adjustment Layer icon on the Layers palette you’ll see a new square thumbnail – this icon represents the layer mask for the adjustment layer.
3. To make the adjustment layer work, you need to create a clipping group, which groups together the Darker layer with the adjustment layer and its layer mask. To do this, select the Darker layer and press Ctrl+G.
4. Now simply select the adjustment layer mask and continue from step 4 in the main tutorial.