A flash grid can help make the light direction from a flashgun far more precise. We show you how you can make one using a few everyday items
Before you start
You will need:
1. Cardboard
2. Black drinking straws
3. Glue/double-sided tape
4. Scissors
5. Ruler
6. Marker pen
7. Black tape


For this shot, the flashgun was placed on a stand, just out of the frame. Using the DIY flash grid allowed me to create the bright spot on the background, with no light spilling onto the flower or the vase
Skill required: Intermediate
Time to complete: 1 hour
Cost: Around £2
You may have come across flash grids before.
Also known as honeycombs, or simply grids, they are usually placed over studio flashlights to create a precise spot of light.
Flash grids work by funnelling the light from the flash through a series of small tubes, arranged in a honeycomb-type pattern.
This concentrates the light into a spot, making it suitable for adding highlights to a scene or portrait, or for simply adding a bright spot to a background.

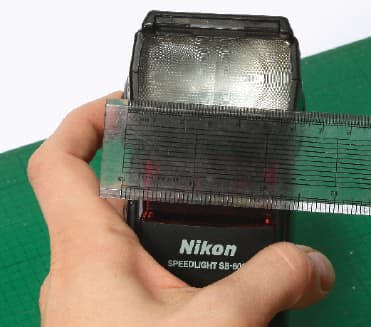
1. Measure the height and width of the flashgun that you intend to use with your DIY flash grid. You will need these measurements to make the cardboard sleeve that will hold your grid.

2. Now use the dimensions you have just measured to draw a flatplan, like the one pictured right, onto cardboard. When folded, this will create a sleeve that you can slide onto your flashgun. Make sure that the length of the sleeve is the depth of your flash head, with 4cm added so that the grid can be created in front of the flash.

3. Fold and glue the sleeve together and leave it to dry. I have used PVA glue, but you may find that a stronger glue, or tape, is necessary, depending on the cardboard used.

4. Measure 4cm along a black drinking straw and cut. You need to cut enough of these 4cm lengths to create a grid that will cover your flash head. Cutting the straws to longer or shorter lengths creates a smaller or larger spread of light.

5. There are a number of ways to stick the straws together and attach them to the sleeve, but I found that double-sided tape works well. Line up the appropriate number of straws and apply double-sided tape to them. Then stick another line of straws on top. Repeat this process until you have enough to fill the cardboard sleeve.

6. Finally, to help hold it all together securely and to make it look more presentable, cover the cardboard with black tape. If there are any gaps where more straws can be added, simply cut some more lengths and slide them into place. You should now be ready to place the grid on your flash and begin shooting.