Raw Converters
As photographers, we are concerned first and foremost with sensor resolution and lens quality. This is how it should be, but we should also pay at least as much attention to raw conversion software.
The principal function of raw conversion is transforming unprocessed RGB luminance information into a full-colour image. This process is known as demosaicing (or de-Bayering, named after the Bayer-pattern sensors used by most digital cameras). The way in which the software works with raw data can affect everything, from the colour to sharpness and image noise.
 This noisy low-light performance shot was taken using a Canon EOS 60D set ISO 5000
While the basic principles behind raw conversion may be consistent, different software programs approach the task in different ways, with some packages being more ‘advanced’ than others.
After demosaicing, the software can continue to work on the image by setting default colour, sharpening and noise-reduction settings, as well as removing moiré patterning and applying automated lens corrections.
The default settings of any program provide the starting point from which a photographer will make his or her own corrections and adjustments, so it is important that the defaults give as good a start as possible.
Testing the software
We have put the same images through each of the seven raw converters on test to see how the default conversion settings have presented the image. The image has then been adjusted to maximise detail and sharpness, while keeping noise to an acceptable level.
As the settings are different in each program, it is virtually impossible to get exact matches for each image from all seven pieces of software. Instead, we will concentrate on the detail and noise in the image, the amount of control that the software offers and, importantly, how straightforward it is to use.
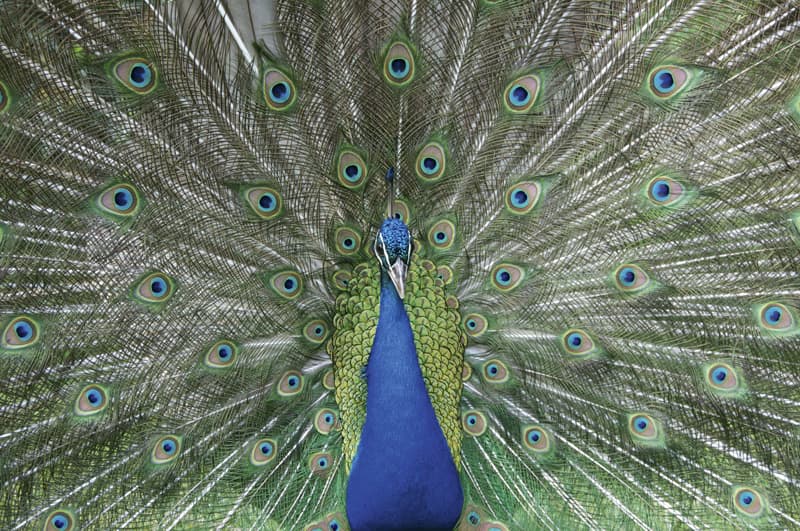
 The image of the peacock used in this test has many complex lines. It was taken on a Nikon D300 at ISO 400.
Adobe Camera Raw 7.1/Lightroom 4.1 £103 (for Lightroom)
 Camera Raw/Lightroom’s default settings are OK, but there is much more detail that can be recovered
Adobe Photoshop Lightroom uses the Camera Raw image-processing engine, so for the purposes of the image-quality test they have been placed together.
Before any settings are applied, the original Camera Raw image has the merest hint of moiré patterning in some of the peacock feathers, which is hardly surprising given the complexity of the picture.
The default sharpening settings are very good, and the moiré patterning is barely noticeable. The level of pre-applied sharpness provides a good starting point for photographers wishing to sharpen their images further. The sharpening settings are clearly labelled and easy to apply to achieve a good result. The edited image has lots of fine detail, albeit with a couple of small artefacts. However, these are only visible when looking at the image at pixel level.
It is a similar story with noise reduction. The default settings in Camera Raw do an excellent job of removing most of the colour noise. A lot of luminance noise is left, but this helps maintain detail in the image.
Once again, editing the image is fairly straightforward. You can be very generous with the amount of colour noise reduction applied, although it does have an impact on contrast and saturation. I removed a little more luminance noise than the default setting to take the edge off the grain, while still maintaining image detail.
Phase One Capture One Express/Pro Around £54/£180
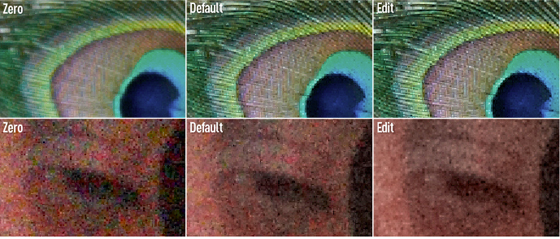 Capture One’s default sharpening settings are about the best on test
Phase One Capture One has long been a favourite of professional studio photographers due to its tethered-shooting and batch-processing capabilities.
In the sharpening test, the standard image with no correction applied looks very similar to the same image opened in the other software on test. In fact, the image looks very similar to the Camera Raw image in which sharpening has been applied.
The default sharpening settings in Capture One are the best of the bunch in this test, revealing a lot of detail, and when it came to editing the image further there was very little that I needed to do. I managed to tweak it just a little more before the image started to look oversharpened, but this did introduce, or at least make more obvious, a couple of small artefacts. I suggest that users of Capture One need apply very little, if any further sharpening to their images.
The default noise reduction is less impressive. Quite a lot of colour noise still remains in the image, although luminance noise seems to have been reduced to a more acceptable level. There is plenty of scope for further reduction in colour noise, and I managed to remove almost all of it in my edited image. Again, I tweaked the luminance noise to take it down a notch to a more acceptable level. Like the other software on test, applying noise reduction does mean that a slight tweak in contrast may be required to add some detail back.
DxO Optics Pro 7 Standard/Pro £135/£269
 Optics Pro provides a good level of sharpening and noise reduction
DxO’s Optics Pro software is very highly regarded. Based around camera and lens modules, which must be downloaded for free prior to use, the software can make automatic lens corrections, sharpening and noise reduction adjustments by using the raw file’s metadata to discover the camera and lens used to take a shot. As a result, a lot of the hard work should be done automatically.
The default level of sharpening in DxO Optics Pro is good, presenting the user with a nice amount of detail, particularly in fine areas, but with the potential to bring out more. Editing the image further was straightforward, with Optics Pro’s range of tools and sliders clearly labelled and simple to use, although I feel a couple of the more advanced settings need to be displayed as they aren’t visible by default. The result is a nicely sharpened image with many of the tiny fine lines in the feathers clearly visible.
Like Camera Raw, the default noise reduction in DxO Optics Pro is very good, and will be perfectly acceptable for most photographers. Colour noise is largely removed, and luminance noise has clearly been softened, which has left a few areas devoid of detail. Adjusting the image from the default starting point allowed me to tweak the level of noise further, adding a little of the luminance noise back in to recover some of the detail, and further reducing the colour noise. In fact, there are virtually no coloured speckles in the edited image.
Apple Aperture 3 £54.99
 Aperture has good default settings and it is fairly straightforward to use
Designed solely for use on Apple Mac computers, Apple Aperture is popular among professionals and enthusiasts alike.
With no sharpening applied, the image of the peacock looks much like it does in other software, although moiré patterning is clearly visible on some of the feathers. Thankfully, the patterning isn’t too strong, and the default sharpening settings don’t exaggerate the effect further.
Generally, the default sharpening is OK. It is perhaps a little softer than in some of the other software packages on test here, but it is clear that further sharpening can be applied to make some of the feathers’ more discreet details stand out.
I found that the image sharpened in Aperture very nicely, revealing many fine feathers and lines without creating many small artefacts.
Noise reduction in this program is clearly operating behind the scenes. On opening, the noisy image looks excellent, with much of the colour noise already removed and the luminance creating a nice film-like effect.
Going to the noise-reduction palette and returning it to the default settings also produces an excellent result, slightly improving the image further. It only needed a tweak in my edited version to take a little more of the sharpness off the luminance noise to produce a pleasing image.
Corel Aftershot Pro £80
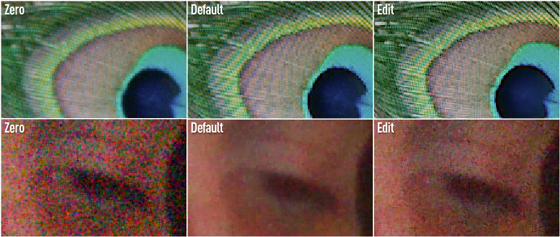 It can be difficult to get as much detail as you want using Aftershot Pro
Formerly known as Bibble, this program was bought by Corel and rebranded as AfterShot Pro, and it now forms the basis of Corel’s raw conversion software.
With all the sharpening sliders set to zero, there is some obvious moiré patterning in some of the feathers. Sadly, the default sharpening settings further accentuate this and moiré patterning becomes even more apparent. When it came to editing the image, it was a case of trying to bring out as much detail as possible, which AfterShot Pro managed very well, and fighting the compromise that sharpening had on the moiré patterning too.
Although this patterning is only really visible if you are pixel peeping, it is something to be aware of, particularly for those photographers taking pictures that contain fine lines and patterned textures.
With no noise reduction applied, it is clear that AfterShot Pro has its work cut out reducing the bright luminous speckles of coloured noise. The default reduction settings that are applied aren’t great. Luminance noise is too smooth, resulting in the loss of most texture and detail. Colour noise isn’t really removed, either, so the result is an image with large tinted patches of purple and green.
Trying to edit the noise further did improve the picture. I added some of the luminance noise back in to improve the level of detail, but it was difficult to reduce the colour noise.
Silkypix Around £260
www.isl.co.jp/SILKYPIX/english
 Although Silkypix can produce good results, it can be a little awkward and slow to use
Perhaps most familiar for being the raw conversion software that comes bundled with Panasonic and Pentax cameras, Silkypix still competes with the more well-known software in this test. It is perhaps.
In the soft, unsharpened image, there is a slight hint of moiré patterning, but it is barely visible when the default settings are applied. Generally, the default sharpening is to a good level. Like the other software here, it offers plenty of scope for further sharpening.
With the default sharpening acting as a good starting point, I was able to sharpen the image to add more impact to even more fine details. The end result is fairly natural, although the slider in Silkypix isn’t the most intuitive to use. It can take some experimentation to really see what each slider is doing, and even the documentation doesn’t make it too clear. That said, with some patience the final result is good.
The default noise reduction in Silkypix has tried too hard to reduce luminance noise in some areas. The result is a mix of patches with and without luminance noise, with noise kept in detailed areas but reduced in smooth areas. While this method of noise reduction is adequate, on close inspection it can look odd.
I added some of the luminance noise back in to help retain detail and provide a texture that was at least largely even across the whole image.
ACDSee Pro 2 (Mac) Around £83 ACDSee Pro 5 (PC) Around £45
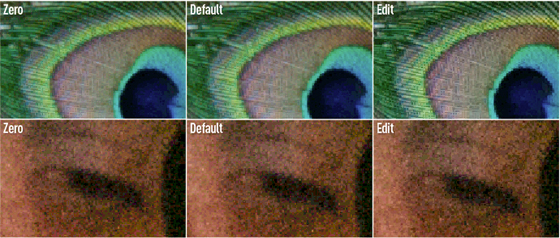
Like Apple Aperture, ACDSee has a non-customisable amount of noise reduction and sharpening already applied to the image on conversion with settings set at zero.
In its default sharpening mode there is just a hint of moiré patterning, but overall there is a fair amount of detail resolved, and in this respect ACDSee seems on a par with most of the other raw converters. When it came to sharpening the image, I was aware that artefacts were beginning to appear and it wasn’t especially easy to make the fine lines of the feathers much clearer. Overall, the sharpening is good, although it could be better.
One thing in favour of ACDSee Pro is how straightforward it is to use. In fact, it is one of the easiest raw converters to use in this test.
The default noise reduction is very good. There is just a hint of bruised colour patches, but by and large most of the colour noise is removed. Much of the luminance noise remains visible, which means there is still some image detail. In fact, when I edited the image further, I found there was little else I could do to improve upon the amount of noise while still preserving detail. Of course, the luminance noise can be removed further, but this results in the inevitable soft, smudged look of surfaces, removing texture as well as noise.
Given its price and simplicity, ACDSee is a raw converter worth some consideration.
Software Choice
Every camera that shoots raw will come with
its own raw conversion software. Many photographers are happy with this
and there are obvious benefits to using software developed by the
manufacturer of your camera. Colours often more closely match in-camera
JPEGs, while extended options, such as dynamic range optimisation and
other image effects, can be found in the software. However, if a person
owns more than one digital camera from different manufacturers,
switching between different raw converters can become a pain. This is
where third-party software comes in.
Ease of Use
While
image quality should, of course, be the overriding concern when
assessing raw conversion software, the program should also be
understandable and easy to use. If software has awkward layouts and
settings, it becomes more difficult and frustrating to achieve the
desired result. If using the software is not enjoyable, it will take you
longer to edit images, which is time better spent taking photographs.
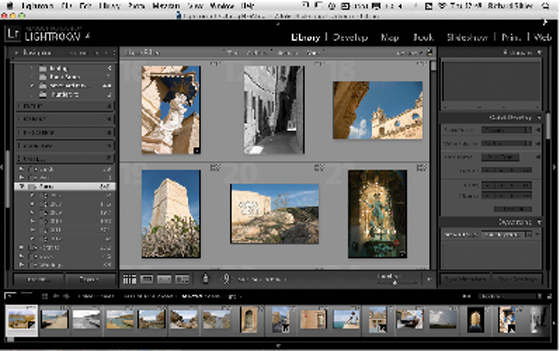 Adobe Photoshop Lightroom is excellent for image management
How
straightforward these programs are to use is hugely subjective. Those
who use Lightroom will no doubt find switching to another raw converter
difficult, and vice versa. Conversely, if a raw converter is too simple,
it will be difficult to maximise the full potential of your images.
Although
most of the software in this test is straightforward, some of them do
have a few quirks. For instance, Apple Aperture has basic sliders for
sharpening and noise reduction as part of the main image settings
palette. However, there are further options that aren’t shown or enabled
by default, but using these allows for a far greater level of control
compared to using a single slider.

Corel AfterShot Pro (formerly Bibble)
has three different noise-reduction options
AfterShot
Pro also has three different noise reduction options: Noise Ninja
Standard, Noise Ninja Registered and Raw Noise, which includes the oddly
named Raw Impulse Noise Removal button. Noise Ninja is actually
third-party software that can be used from within the standard AfterShot
Pro dialogue. If you have a registered copy of Noise Ninja, the
extensive and excellent settings can be used, including dedicated noise
profiles, depending on your camera and the image sensitivity.
Some
software will also help to catalogue and organise images. Lightroom,
Aperture and Capture One really stand out in this respect. Meanwhile,
other software performs image adjustments based on the particular
camera, lens and exposure settings used. This means all basic
adjustments can be automatically performed, leaving you to get on with
the fine-tuning of your images.
 DxO Optics Pro has a huge range of automatic corrections based on the specific model of camera and lens used
DxO
optics has long been the industry standard for automatic image
correction based on the camera and lens used, but others have started to
follow suit in the past few years. Capture One and AfterShot Pro both
offer automatic lens corrections, while Adobe has added this facility to
Camera Raw and Lightroom, even giving photographers the ability to
create their own profiles for their own camera and lenses.
Value for Money
Price
should, of course, be a consideration, but given how long you could
potentially spend editing images, this is one area where it really pays
to get software that will suit your needs. Otherwise, you might save a
few pounds only to end up spending far more time than necessary staring
at a screen.
With all the software in this test available as
free 30-day or 60-day trials, why not download a few packages that have the
features you want and decide which one you prefer?
Verdict
Based
solely on the tests of sharpness and noise reduction, it is difficult
to decide which of these raw converters is best. Looking at the
sharpened images, the main contenders are Phase One Capture One, Adobe
Camera Raw/Lightroom and DxO Optics Pro 7 – and it is a tough call as to
which comes out top. These three programs are also the most capable of
dealing with noise reduction, with ACDSee Pro 2 not far behind.
I
think that Capture One’s sharpening is the best on test, while Camera
Raw/Lightroom and DxO Optics Pro 7 are about the best for noise
reduction. However, DxO Optics Pro 7 offers an extensive range of
excellent automatic lens corrections, although it lacks the more
extensive image management options of Capture One or Lightroom.
Overall,
I think Adobe Photoshop Lightroom, powered by the Camera Raw processor,
is about the best combination for producing excellent images and having
available all the automated lens corrections and image management and
output options. Importantly, it does this quickly and efficiently.
However, what this test demonstrates is that when it comes to image
quality alone, there are other good raw converters, such as Capture One
Express and ACDSee Pro 5, that produce good results, but at a
significantly cheaper price.

