Photo Insight with Andrew Sanderson

A renowned photographer, tutor, author and Ilford Master Printer, Andrew Sanderson offers practical tips on working with film and traditional darkroom techniques
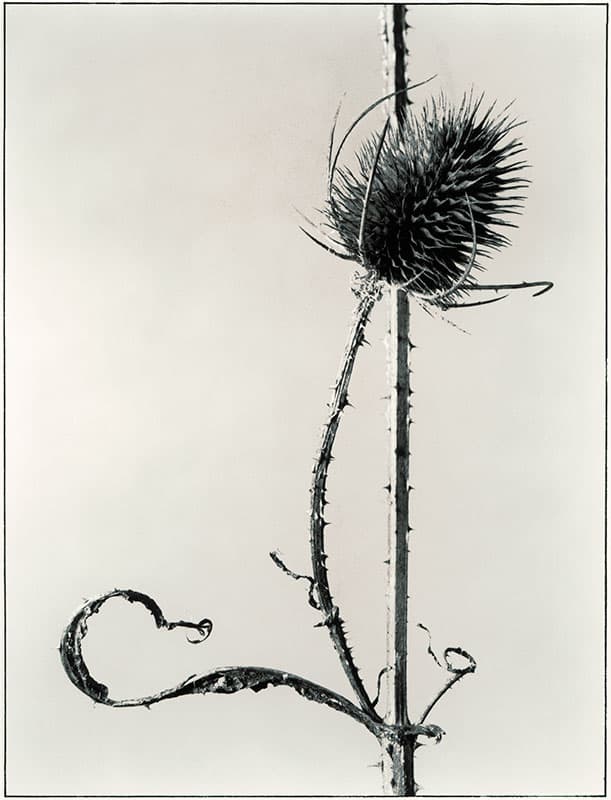
This image of a teasel is from a series that I took when I was working on my book Home Photography: Inspiration on your Doorstep. The book focuses on how to turn subjects that can usually be found around your own home into creative and beautiful photographs. As well as the teasel shown in this image, I have also created photos using tomato stalks, jasmine stems and the shadows of flowers falling through a window. I picked the teasel from a garden near my home, so it was the perfect subject to add to the book.
The photograph shown here was taken against a white wall at my house and lit with a fairly straightforward lighting set-up of one 1,000W tungsten lamp. It was shot on Polaroid Type 55 film. This emulsion gave a proof print and a 5x4in negative. Unfortunately, it is no longer available and old stocks of it are fetching high prices on sites such as eBay. A quick internet search shows the film up for grabs for £115 for 20 sheets, plus more than £20 postage, so it is expensive.
I used a 5x4in reducing back on my 5x7in De Vere Devon monorail large-format camera with a Schneider Symmar-S 180mm f/5.6 lens. You can still buy both of these items on sites such as eBay, although you may have to spend a pretty penny on them in order to replicate this look. As always, we recommend that you buy from a reputable dealer if you buy second-hand items like this.
A lot of my flower, plant and still-life images have been shot using this De Vere Devon monorail and Schneider Symmar-S 180mm f/5.6 camera and lens combination. The De Vere allows a lot of control and I can get in really close if I need to for the composition I want.
I gathered a few of these dried teasels from the overgrown garden near my home and photographed them in a number of different ways over a few months. By the time I came to create this composition, the flower had dried out, as you can see. Teasels (or Dipsacus as it is also known) are easily identified by their prickly stem and leaves, and the purple, dark pink or lavender flowers that form a head on the end of the stem. This particular one appealed to me because of the combination of straight lines and curves. The contrast of the flower and the thorns is also nice, especially in almost silhouette as shown here. It is a good idea to look for these contrasts of shapes and angles, as well as colours, in any photography you create.

I positioned the vertical line off-centre and turned the teasel so that it would show the slight curve of the stem bisecting the vertical. This made the dried leaf stick out to the left. I composed the rest of the image so that the leaf occupied the bottom left of the picture and used it to balance the head in the top right.
As with all still-life compositions, you can make sure you have the subject framed exactly as you want before hitting the shutter, which means it’s perfectly suited to film photography. Your subject will not move unless you want it to, so you can take as much time as you need. The Polaroid sheets I shot this with provided a proof, which again was perfect for making sure my composition was spot-on in case I wanted to tweak something and retake the photo.
When I printed my composition, I produced a full print with tones throughout the range. Afterwards, I gave it a slight treatment in sepia bleach. I discussed my sepia process in my last Photo Insight of the cow in the clearing (AP 1 June), although this process can vary, depending on the look you want to create. For this image, I washed the print and placed it in a tray of bleach for 1-2mins until much of the image had faded. I rinsed the image for about 3mins to stop the bleach and then placed the print into the sepia toning mix. The image then started to reappear. I removed the print from the toner tray once it had reached the desired look, and then rinsed, washed and dried it to produce this beautiful sepia-toned photograph. I followed this with an aged, weakened sepia bath, which gave the distinctive colour split and kept the highlights pale, as in a lith print.
For those of you unfamiliar with them, lith prints use standard black & white photographic paper with lithographic developer to produce a print with dark shadows and soft, bright highlights. Tones, colours and subtle hues different from standard black & white printing can be achieved.
The bleaching effect of the aged toner lightened and reduced the uneven tones of the wall behind the teasel and made the graphic shape of the teasel stand out even more.
Andrew Sanderson was talking to Debbi Allen

If you would like to read more about paper negatives, Andrew’s book Paper Negative Photography is available from www.blurb.com, price £15


