Amateur Photographer verdict
An exceptionally powerful photo editor that matches, and often exceeds the capabilities of Photoshop. Terrific value and viable for everybody from beginners to professionals.- All inclusive features
- Fantastic value
- Extensive range of powerful tools
- No cataloguing or browsing features
- Takes some learning (though well worth it)
Affinity Photo 2 is the perfect Photoshop alternative for anyone who wants professional photo editing power without an Adobe subscription. And this really is a professional tool, matching or even beating Photoshop in many key areas. It’s recently been re-released in version 2 (now with a free v2.1 update) to incorporate many new features. In fact we cover a lot of these in a set of Affinity Photo 2 tutorial videos you can watch online:
- Affinity Photo 2 introduction and new features
- Focus stacking/Focus Merge in Affinity Photo 2
- HDR Merge and Tone Mapping in Affinity Photo 2
- Retouching and object removal in Affinity Photo 2
- Affinity Photo 2’s non-destructive raw processing
Affinity Photo 2 at a glance:
- Price: $69.99, for iPad $18.49 / £67.99, for iPad £17.99 – or $164.99 / £159 for Affinity’s entire creative suite across all platforms.
- Web: affinity.serif.com (note that the company was acquired by Canva in March 2024)
- Serious Photoshop alternative
- Many new features in Version 2
- Powerful layers, masking and retouching
- HDR merge, panoramas, focus stacking
- Adjustment layers and Live Filters
Affinity Photo 2 is one of three professional creative applications from Affinity and works alongside Affinity Designer and Affinity Publisher as part of a tightly bound creative suite.
Affinity Photo works perfectly on its own, however, and is just about the closest direct alternative to Photoshop on the market. Like Photoshop, it’s designed for sophisticated, detailed and advanced image editing, though can also be used for quick and simple image enhancements too.
Keep in mind that Affinity Photo is an all-round design tool, not just a photo editor. In this respect it’s a lot like Photoshop; while both are about the most powerful in-depth photo manipulation tools around, they can do more. Affinity Photo supports vector graphics for creating illustrations and type layers for adding text. Here, though, we look specifically is Affinity Photo 2’s potential as a photo editor – and it has plenty.
The price of Affinity Photo 2 is slightly higher than the original Affinity Photo, but still low for software of this calibre – low enough to be mistaken for a budget photo editor for novices, though nothing could be further from the truth. And Adobe refugees will be delighted to learn that not only are there no subscription plans, and that until version 2, every single update since launch had been free. Indeed, since the launch of v2, there has been a free v2.1 update.
Affinity Photo is not really designed for beginners. There are no cataloguing and browsing features and it doesn’t offer one-click insta-ready ‘looks’ for your social channels. This is an old-school photo editor, Photoshop style, but without the cash outlay or the subscription.
Affinity does not have a cloud-based ecosystem like Adobe’s Creative Cloud, and while there is an iPad version of Affinity Photo (which is extremely good, by the way), there’s no equivalent of Adobe’s cloud based image library, as used by Lightroom.
What it offers is an extremely powerful non-destructive workflow, sophisticated layer and masking controls and the ability to carry out focus stacking (focus merge), HDR merge and tone mapping and HDR merge, and all without additional plug-ins or paid-for ‘extensions’. All this is on top of non-destructive image adjustments and unique ‘live filters’ which allow non-destructive use of filter effects which are normally a one-way ‘destructive’ option in other editors.
Affinity Personas
Affinity Photo offers five different workspaces for different tasks. These aren’t just different configurations of the same tools. The tools are different, and are used at different stages of the workflow.
In order of appearance on the top toolbar, these are the Photo Persona, Liquify, Develop, Tone Mapping and Export Personas. You don’t go through them one by one in linear order. You can switch between them manually as required and in some instances they will open automatically.
For example, if you open a raw file it will go straight into the Develop Persona where raw processing is carried out. It’s a bit like Adobe Camera Raw, but integrated into the Affinity Photo interface. And if you create an HDR Merge, you’ll be taken straight to the Tone Mapping Persona to make your adjustments.
You’re unlikely to spend a lot of time in the Liquify Persona, unless you do some heavy retouching and like Dali-esque reality enhancements. The Export Persona is for choosing file formats, colour and compression settings. Affinity Photo saves images in its own bespoke file format, so you need these export controls to produce regular JPEG or TIFF images for sharing or publishing.
Most of the work in Affinity Photo takes place in the Photo Persona, so let’s take a look at that first. This is the closest thing to editing images in Photoshop.
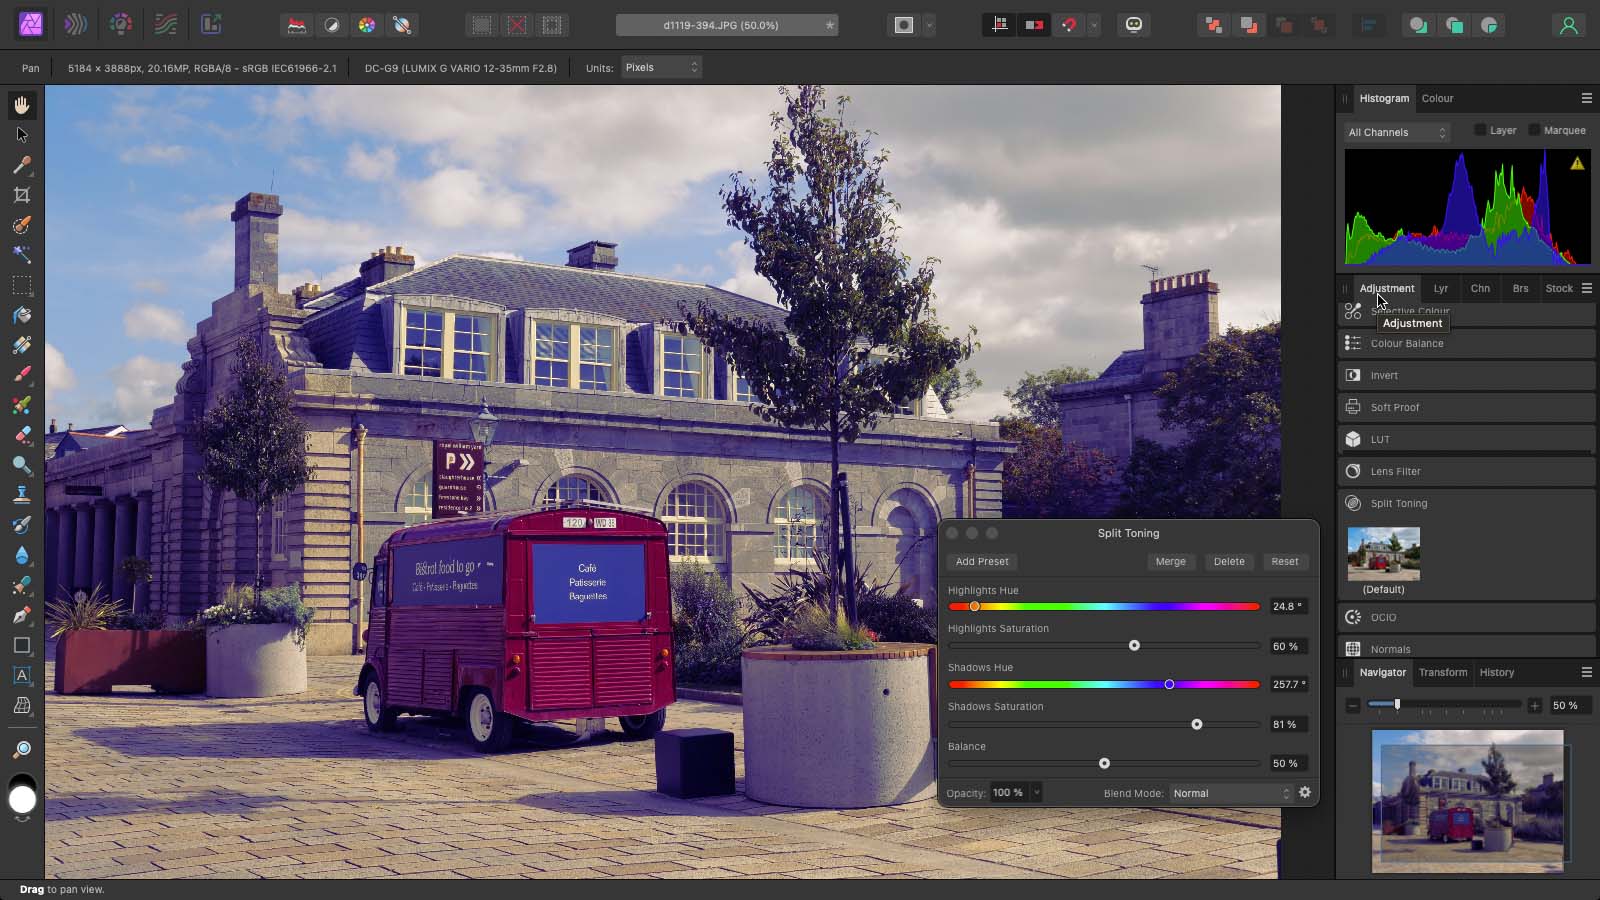
Photo Persona
The Photo Persona is laid out in the same way as almost every regular photo editor. The left-hand side of the screen is a vertical strip of tools, while on the right is a set of panels for layers, adjustments, filters and more. These panels can be dragged off and floated separately on the screen, or recombined in any arrangement of tabs and panels that suits you.
Most adjustments in Affinity Photo are non-destructive. When you apply an adjustment, it’s added as a new adjustment layer and can be altered at any time in the future. Each adjustment layer can have its own mask and blend mode, which is just how Photoshop works.
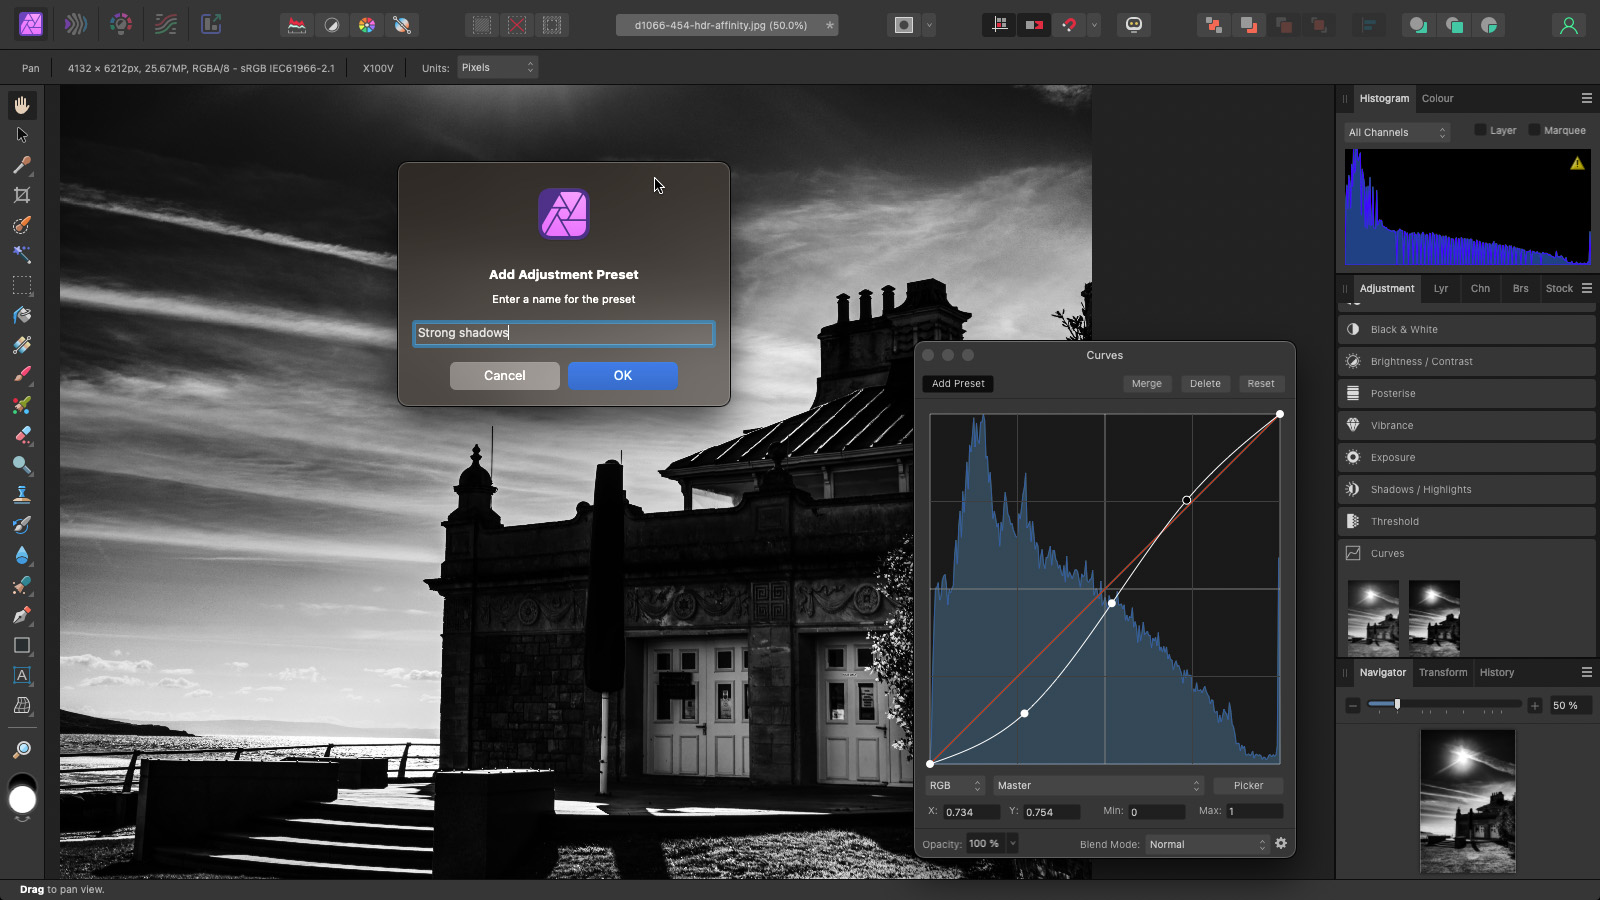

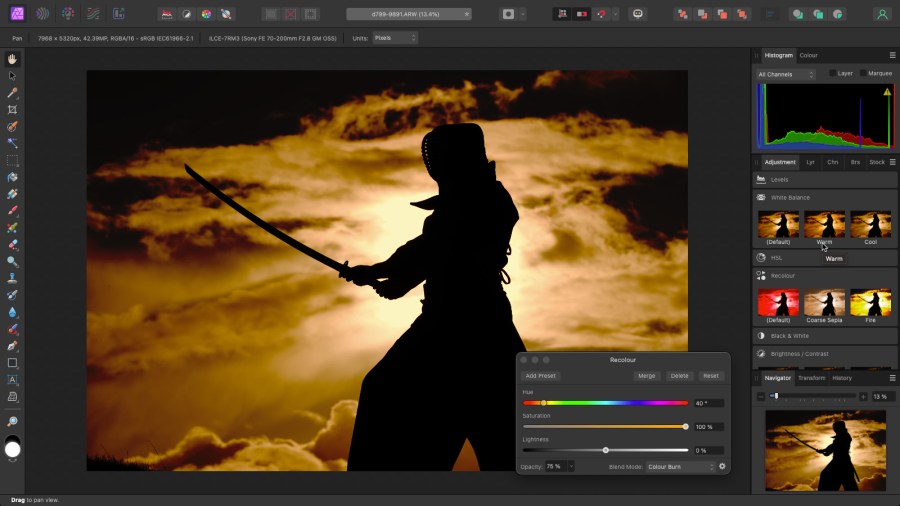
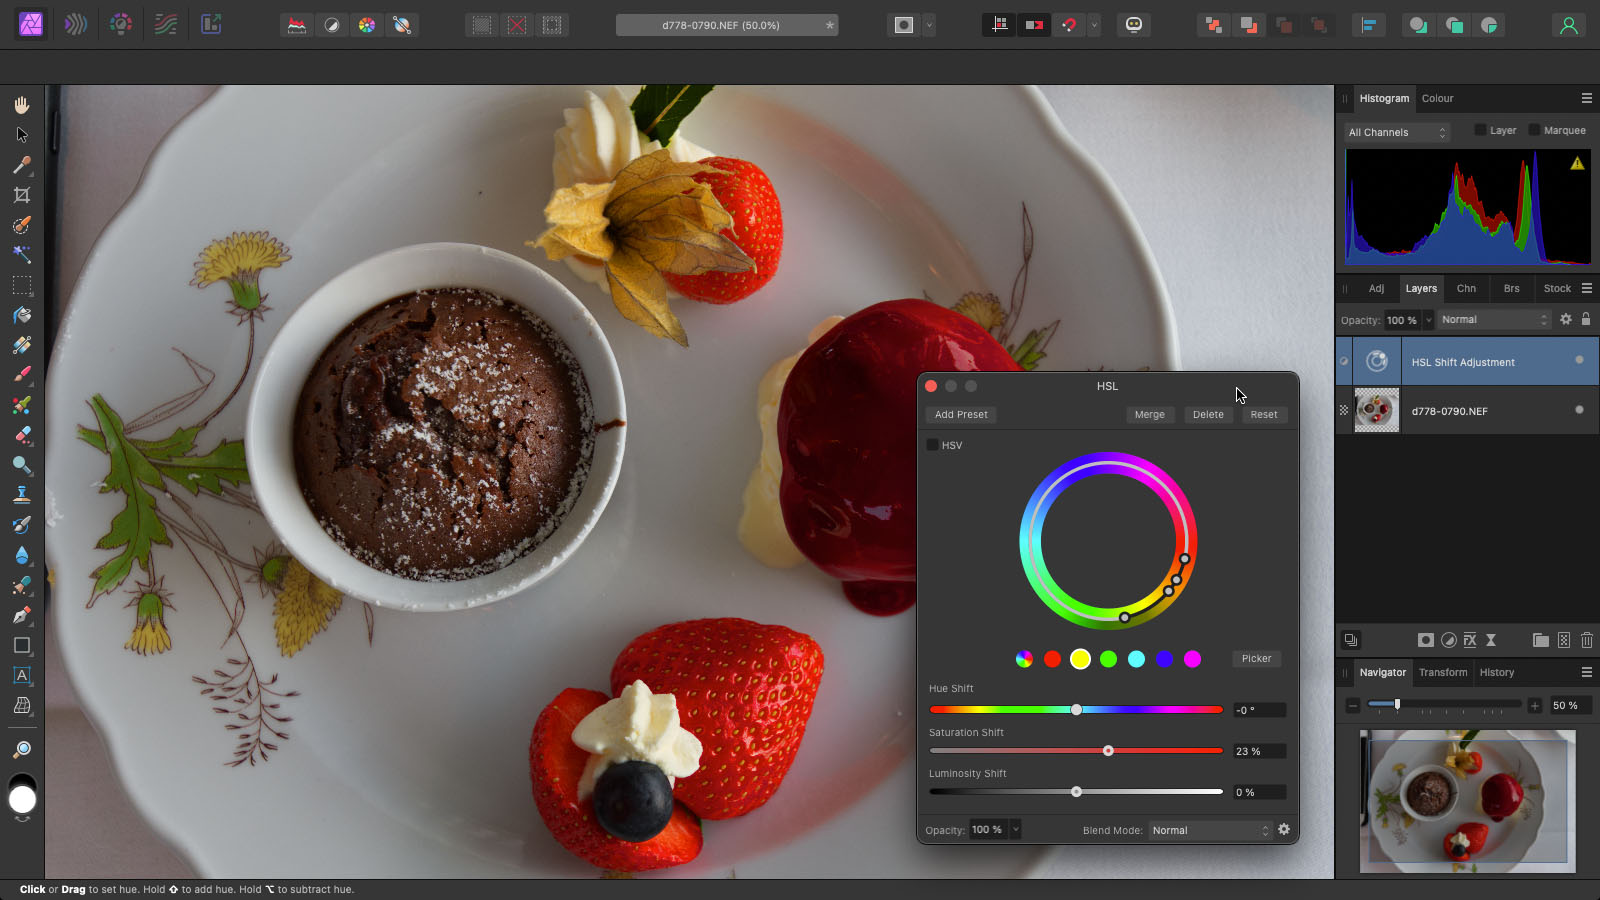
However, Affinity Photo also offers adjustment presets, which appear in the adjustment panel as small thumbnails showing your image with that preset applied. It only takes a moment to save any manual adjustments you make as presets too. This is a really neat system that lets you save and re-use your favourite adjustments.
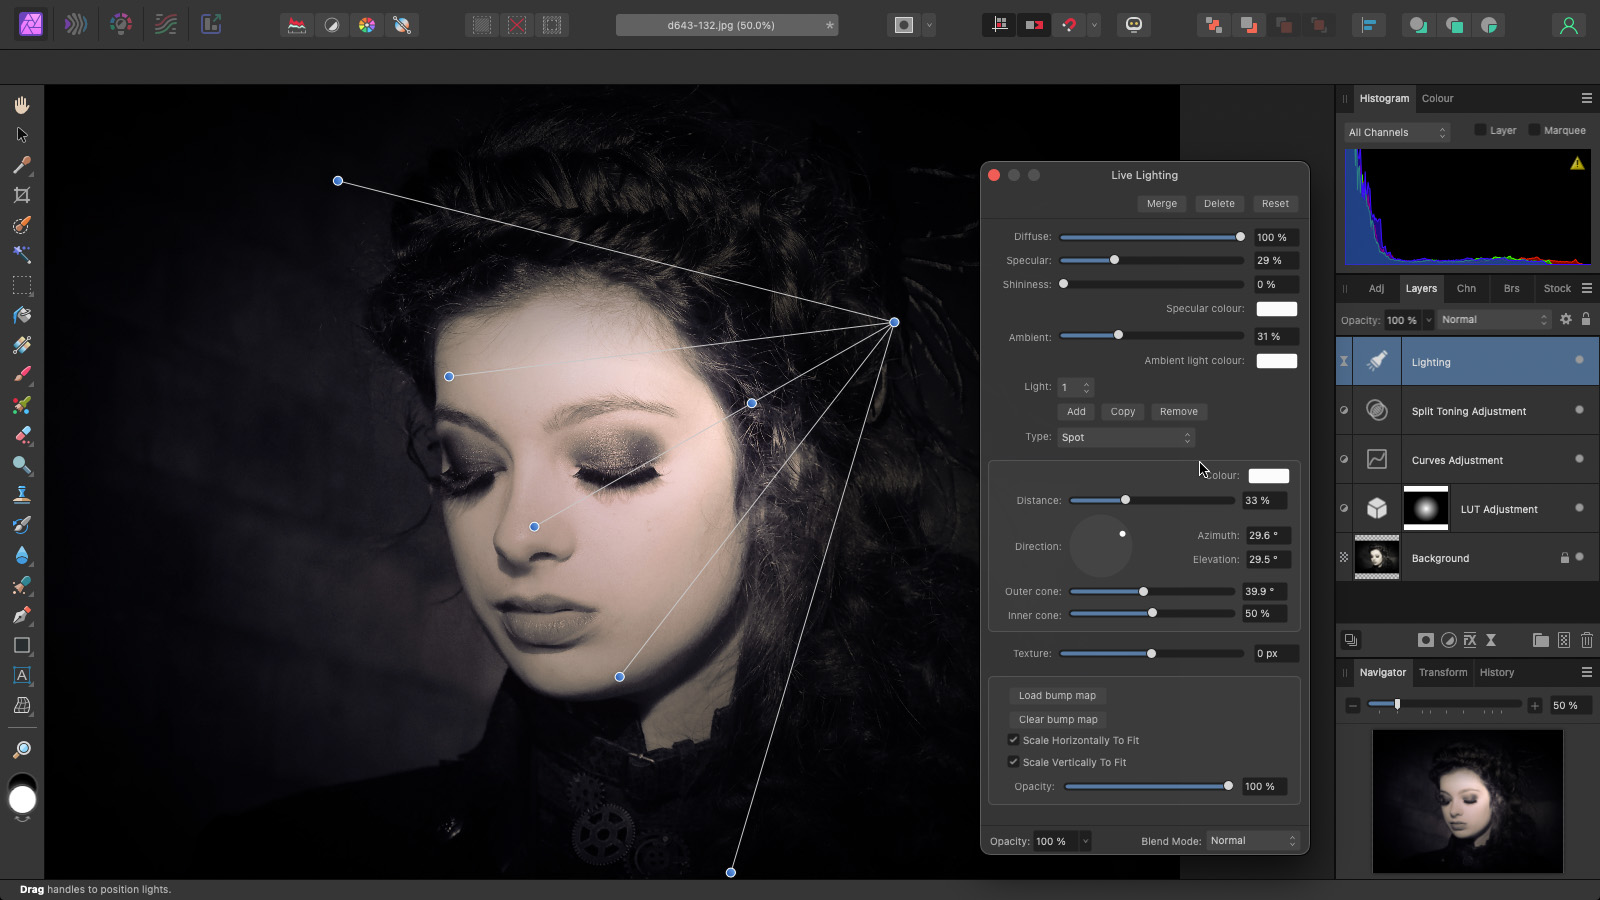
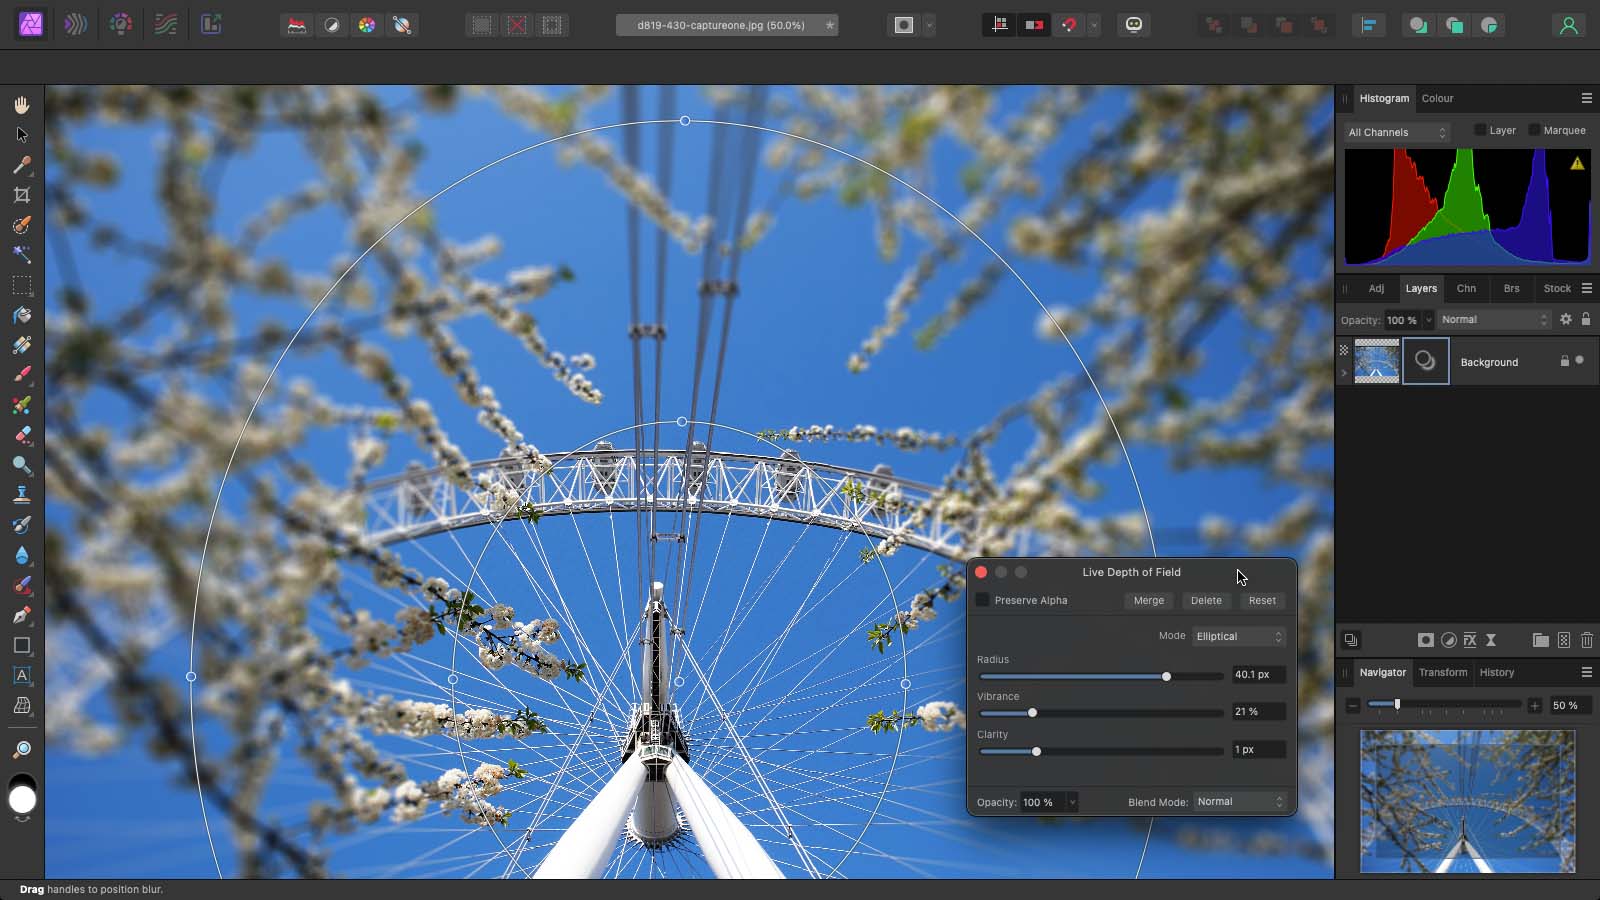
Affinity Photo also offers a large selection of non-destructive Live Filters. You can apply noise reduction, depth of field tilt-shift effects, even complex lighting effects in a completely reversible way. This is the advantage of using the bespoke Affinity file format – because this ‘editability’ is preserved when you save, close and re-open the file.
One of the new additions in Affinity Photo 2 is a new Mesh Warp Live filter. With this you can make localised perspective and warp adjustments that can be checked or changed later – it’s a lot simpler to use for photographs than the Liquify Persona.
Of course, you can combine regular image layers in Affinity Photo. Indeed, Affinity says the number of layers supported is infinite, though you’re likely to run out of memory at some point, we’d guess.
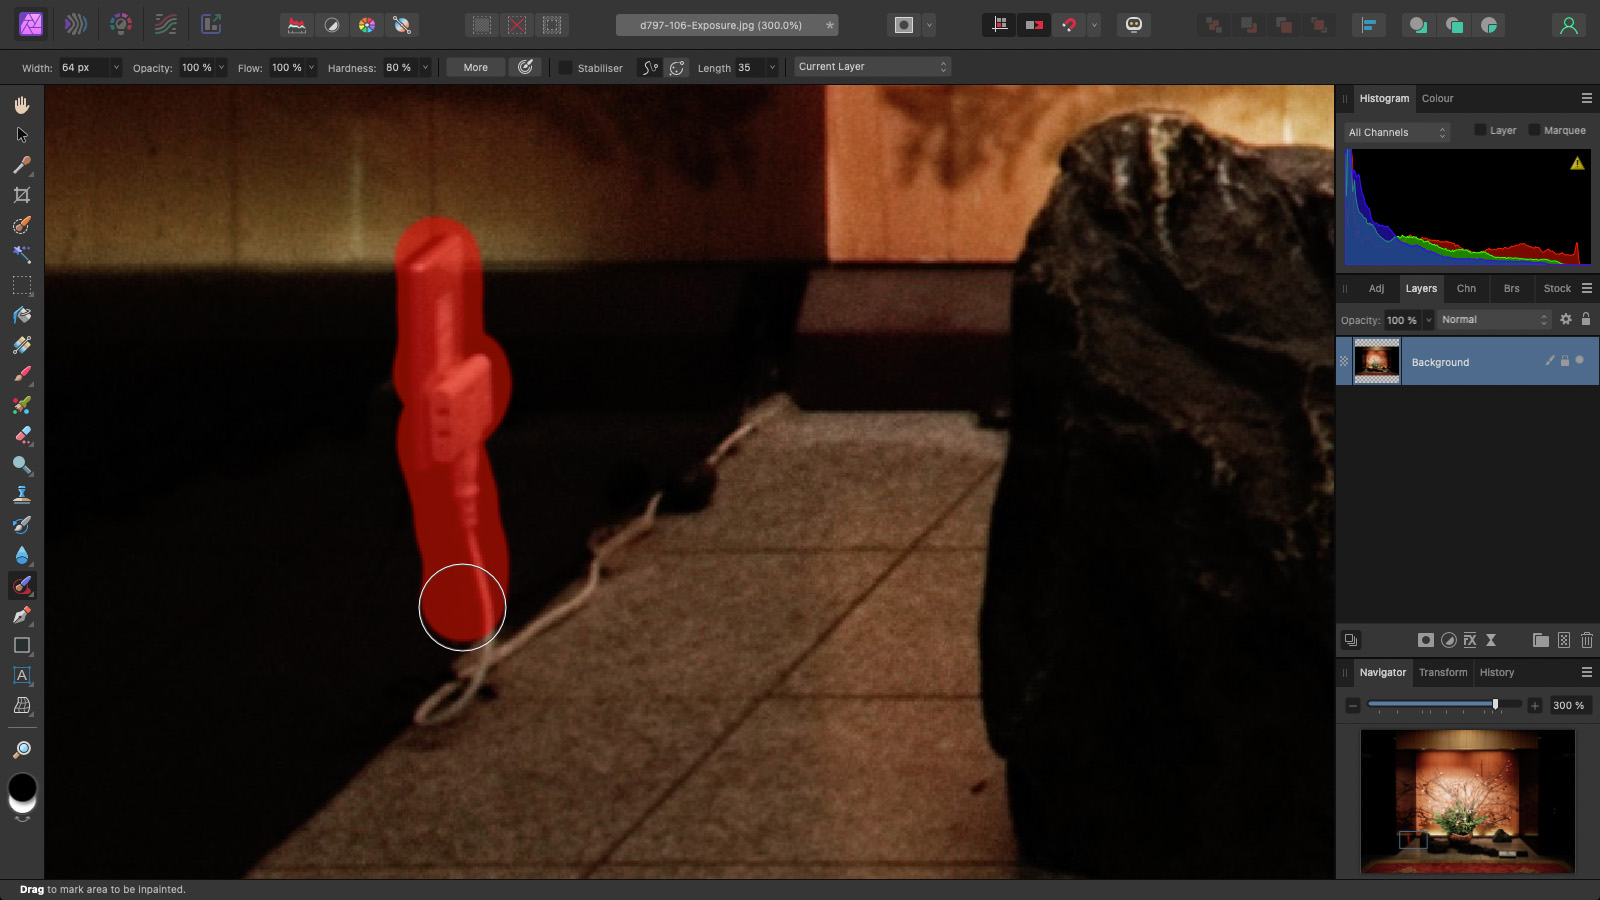
Everywhere you turn in Affinity Photo, you find tools of unexpected power or usefulness. Portrait retouchers may appreciate the frequency separation feature, and amongst all the regular cloning and retouching tools is an easily-missed ‘inpainting’ tool that you can use to paint over objects you want to remove – instantly.

New features in Affinity 2 include the ability to combine masks non-destructively and create Live mask layers containing luminosity range masks, hue range masks and ‘band pass’ masks. These and new ‘Layer State’ options could prove useful for photographers working on complex photo-montages or image composites.
Develop Persona

This is where Affinity Photo processes raw images and it opens automatically with raw files. It has a lot in common with Adobe Camera Raw and offers a wide range of adjustments for optimising raw images, before processing them into an editable form for the Photo Persona.
New to Affinity Photo 2 is that this raw processing can be non-destructive. You can use a ‘raw layer’ and go back at any time to change your settings. The Affinity Develop process need no longer be the one-way process it was before. This puts Affinity Photo on the same level as Photoshop in working with non-destructive raw ‘layers’. Neither has the same seamless raw processing as Adobe Lightroom, but they do blend raw processing with far more sophisticated edits outside the scope of Lightroom’s more limited toolset.

Affinity Photo is not designed around automatic corrections and quick fixes. It will open raw files as they are and will leave you to do any tweaking or fettling needed in its five tabbed panels.
You use the Basic tab to adjust exposure, contrast, clarity, saturation, white balance, shadows and highlights and more. Not all of the tools are enabled by default, and the White Balance checkbox is pretty inconspicuous. It doesn’t offer scene type WB presets, either, so you’ll have to type in your own temperature/tint values or use the sliders.
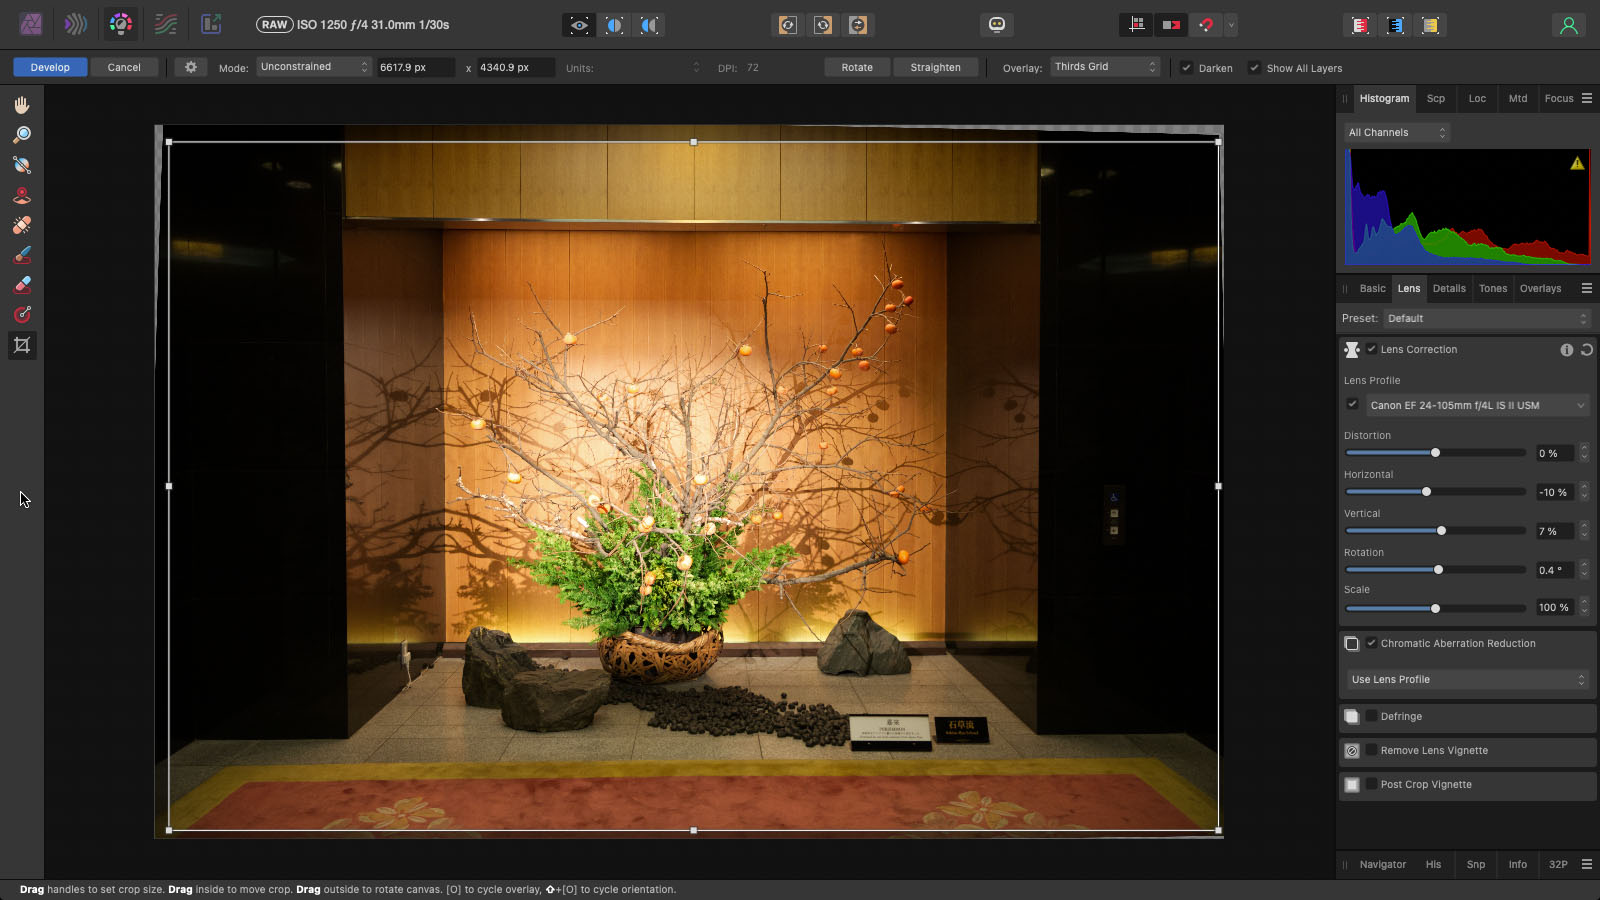
In the Lens tab you should see that Affinity Photo has automatically selected a lens correction profile, but you can also carry out perspective corrections here too. Affinity Photo will apply chromatic aberration correction from the lens profile, and may give even better results using the ‘Estimate from Image’ option.
The Details tab offers, as you might expect, noise reduction tools, but here also is one of Affinity Photo’s many hidden gems. The ‘Detail Refinement’ checkbox reveals a pair of simple sliders that enhance the definition and clarity of fine detail far more effectively than regular sharpening tools and without the halos and edge effects.
The Tones panel has tools for adjusting curves, black and white conversion and split toning, but these are things you might elect to do in the Photo Persona.
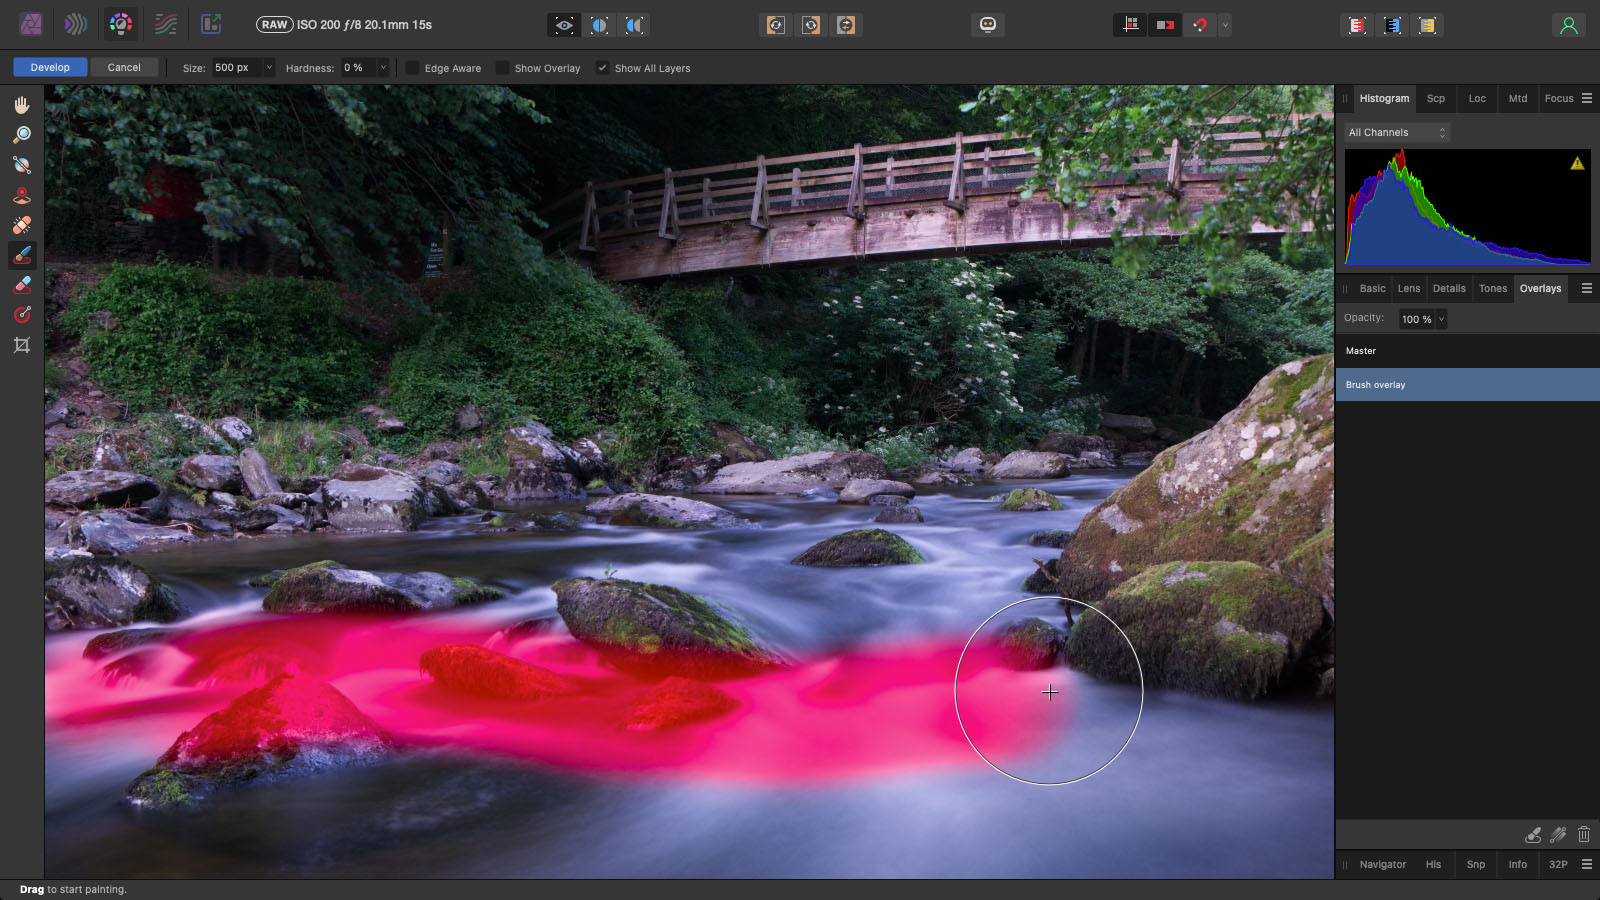
The final Overlay tab also illustrates the potential crossover between the Develop and Photo Personas. You can carry out local adjustments in the Photo Persona, but the advantage of using the Develop Persona is that it can access the extended tonal information in raw files.
Tone Mapping Persona
This might seem like a specialist tool, but it’s worth a closer look for a couple of reasons. The first is that HDR is not just an in-your-face special effect that’s (arguably) had its day, but an important technical tool for any photographer trying to manage very high brightness ranges in the scenes they photograph.
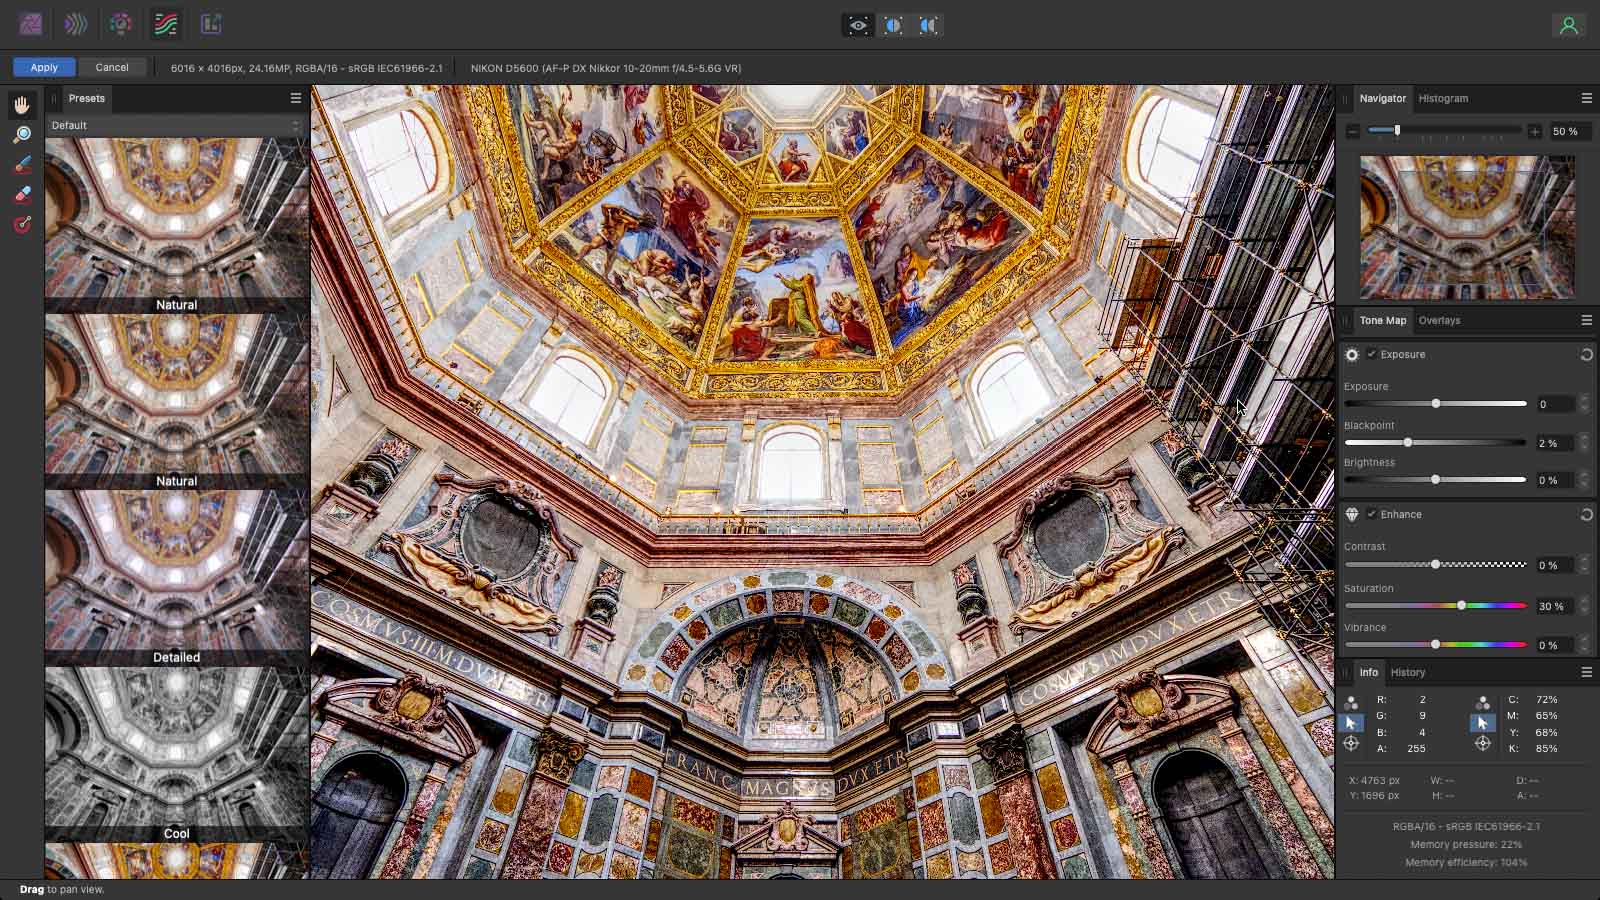
The second is that Affinity Photo’s Tone Mapping Persona is extremely good at it! It can automatically merge a stack of bracketed HDR exposures, but it can also tone map a single raw file – and very often, a raw file will have all the extended tonal data you need.
From there you can choose a Tone Mapping preset – and these are very good – or make adjustments manually. It’s often simplest to start from a preset and then wind back the settings (or beef them up) to suit the scene and your own taste.
The bottom line is that Affinity Photo can Tone Map (it doesn’t use the term ‘HDR’) at least as well as any other tool on the market and, if you like your HDR subtle and not supersaturated, it’s actually one of the best.
The HDR merge facility built into the Tone Mapping Persona is not the only clever image merging tool. Affinity Photo also offers focus stacking and panorama stitching.
When you stitch panoramas you inevitably get ‘wedges’ of blank space around the edges where the software has adjusted, repositioned and transformed the individual frames to fit seamlessly, and in Affinity Photo you’re left to crop these out manually. It doesn’t have the clever Boundary Warp or content aware fill options in Adobe Lightroom, but then it does do an extremely good job of blending images and, in particular, blending exposure variations seamlessly.

Affinity Photo can also edit 360° spherical images from cameras like the new Insta360 X3. These need to be in JPEG format and in Affinity Photo you need to swap to an Equirectangular Projection mode via the Layers menu. And if you just went “What?”, welcome to Affinity Photo. If there is a technical term for a process, Affinity Photo will quote it.
So yes, Affinity Photo can be quite technical. But as long as you’re ready to learn some new jargon and do some exploring, you’ll soon discover just how much power this program puts at your fingertips. It may not have the surface gloss and novice hand-holding of some other programs, but it does get the job done very well indeed – and treats you as an adult.
The real issues with Affinity Photo 2, if any, are that it has a steep learning curve and that it lacks any kind of browsing tools. The learning curve won’t be a problem for more experienced photo editors, but even they may need to spend a couple of hours learning the ropes.
What is non-destructive editing and do you need it?
Non-destructive editing is where your original image stays unchanged and your editing software effectively ‘previews’ your edits, saving them as processing instructions rather than applying them directly to the pixels in your photos.
But with non-destructive editing, your edits are only visible inside the software used to create them. Affinity Photo edits are only re-editable if you use the bespoke Affinity file format to save your images, just as your Lightroom edits are invisible to any other program.
Non-destructive editing gives you the freedom to change your mind about your adjustments at any time in the future, but locks you into the software you used to create them.
Affinity Photo for iPad
Affinity Photo for iPad is sold separately or as part of Affinity’s new Universal License bundle. Affinity effectively optimised Affinity Photo for a small touchscreen interface long before Photoshop for iPad was released. It’s true that Affinity Photo for iPad can’t replicate the whole desktop interface or feature set, but it gets remarkably close.
It is a slightly more simplistic workflow than Adobe’s Creative Cloud system, but one that doesn’t rely on proprietary servers or hosting. Affinity Photo for iPad uses Apple’s own iCloud storage system which, for Mac users, is part of the operating system already and, perhaps, their regular workflow.
Affinity Photo 2 Verdict
Affinity Photo 2 is a significant update of a hugely powerful image-editor that matches pretty much anything that Photoshop can do and improves on it in many areas. In that respect, its low asking price is especially impressive. Just don’t get the idea that this is budget software, dated, dumbed down in some way or horrible to use. The opposite is true.
It does help, however, if you already know your way around a photo editor and are prepared to learn. And while Affinity Photo is part of a broader design ecosystem, there is no centralised asset management or cataloguing system like Adobe Bridge. Also if you want one-click presets and insta-ready ‘looks’, you’re in the wrong place.
Having got that out of the way, the bottom line is that Affinity Photo 2 is an exceptionally powerful photo editor that can handle everything from non-destructive adjustments through HDR, panorama stitching, focus stacking, 360 image editing right through to professional retouching, multi-layer composites, illustration and original artwork. There’s even a 30-day trial to help you make your mind up.

Featured image credit: Rod Lawton.
To find out more in-depth about Affinity Photo 2’s capabilities, visit our other further articles:
Fix perspective and lens distortion with Affinity Photo 2
Creative depth of field effects
Layer images with blend modes
Combine and mask image layers
Master raw editing
Master Affinity Photo 2 for iPad
Create perfect panoramas
See more options in our guide to the best photo editing software, or have a look at the best photo apps for smartphones.